The Kitchen - Stage 1

The Builder has been working like crazy so we haven't had a lot going on in the renovation department.  I think we have the master bath plan almost completed. But The Builder had a three day weekend last weekend and decided he needed a project to do. So after forcing him to relax on the 4th of July, he was ready to tear something apart on Saturday. He asked me if I was ready to take down the pass through in the kitchen.  I think he purposefully picked something he know I couldn't say no to!

Let me refresh your memory on the pass through from my kitchen to the dining room:


Like all pass through's that I've seen, this one is a waist of space. The 'bar' isn't wide enough to really eat at. The small opening isn't conductive to ventilation - in fact we swelter in here in the summer if we turn on the oven, even when the rest of the house is cool and comfy with the a/c running. When we had the TV over the fireplace, it did at least allow you to stand there and duck down a bit to catch a favorite TV show while doing dishes. Aside from that, utterly useless. 

When the builder first asked me about a kitchen renovation, I wanted to take down the wall that has the arched opening. Unfortunately, that corner there is a load baring wall. It would cost thousands of dollars to put in a new beam to support the weight of the upstairs. That might happen on design shows, but I have to live in reality, so it was a no go for me. The same with widening that opening to the kitchen. There's no place to widen since we're stealing the hall closet to expand the pantry (more on that in another post!). So that wall and that narrow opening have to stay.  The pass through does not.  So demo went something like this:
We removed the trim someone installed as an afterthought. I already knew we had the cheapest of builder grade cabinets, but the white paint gave me a false sense of thinking they weren't as bad as I thought. Ha. What we discovered is that only the front of the cabinets are wood. We have 'plastic' wood veneer adhered to the side of the cabinets and cheap trim along the top to add...something. The cabinets have always been to small to hold anything other than rarely used items. I'm sure I can find another spot for my Christmas Nutcracker plates and my Christmas tea set (the only thing of value that was in them!).

Next The Builder we took down the cabinet and started cutting into the wall:


Disclaimer:  The Builder was quite horrified annoyed that I was including the photo's of him in all his sweaty glory. We live in Houston and it's humid here. There's not much I can do about it. This is part of home renovations!

I was surprised at the beam running through the middle of the wall. The Builder was not. Apparently this is standard when you need to make sure you have something to screw the cabinets into so they won't fall off the wall. Go figure. He said the pass through was clearly an after thought as it didn't tie into the wall as it should have and was done later. Really, an afterthought?! WHY!!?
He even has helpers...

We needed to add a wall switch for the pendent lights we knew we were going to put up. The only way to really see where the electricity was running and easily install a new box was to take the drywall down. So we did. And if I was hoping beyond home that this corner wasn't really a load baring wall, my hopes were quickly dashed. This was one of the walls that had really bad texturing on it, so taking down the drywall allows us to re-install it and correctly texture. We also will be able to switch out the old beige electrical outlets and wall switches for nice clean white ones. Win win!


Everything all opened up. There are weird 'steps' in the wall where the beam came out. That meant more patch work than what I was thinking but The Builder took it in stride. Already you can see how much more open it looks.  This was Saturday afternoon.  The demolition part didn't take much time at all, aside from two separate trips to Home Depot to pick up supplies (we never remember everything in one trip, even when we have a list!) and a third trip to Lowe's because I didn't like the pendent options available at Home Depot. More on that in a bit. You can see the new junction box he installed for the double light switch. The power was off in this photo so he could get everything wired in, but I think you get the idea.


Let's cut to the chase, shall we:
This almost looks done.  This was last Sunday evening. The drywall was done and the spray texture was up. I was really itching to see how the pendants I chose were going to look once installed. But the reality is I didn't want ceiling paint on them or one of the two shades of wall paint either.

And now you can see my 80's laminate counter tops in all their horrific glory. Yeah, we're not doing the counters this year. Nor are we ripping out the rest of the disgusting particle board cabinets that desperately need to be replaced. Those will most likely be done next year (we still have an a/c that really needs to be replaced next year). I'm contemplating some type of counter top cover up but we shall see.

Yes, that's my dining room table covered in junk.  The few things from the cabinet, my cook books that were on a shelf above the pass through, and an assortment of nicknacks that need to find new homes. 


And here we have it this afternoon after the last coat of ceiling paint and touch up paint was completed:

 Yes, the ceiling is striped in the photo. In person, you can see a slight difference, but the camera really picked it up. "Eventually" we're going to have to repaint the entire ceiling from kitchen to dining room.  Eventually is a really distant thought right now.  This counter height bar isn't remotely practical enough to allow for every day use (I can see dishes falling off that narrow bar...) and it quickly becomes a clutter magnet. I'm going to have to put this picture on my phone to remind myself what it's supposed to look like.

This is from Lowe's web site to give you an idea of what it looks like when the lights aren't on (it's not photographing well either way:
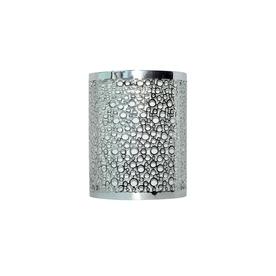
There's a white paper shade inside so it's not spakly (which was not a look I was going for) and it blends well with the nickel finishes that are already in the home.

Lowe's really has the best selection for pendant shades.  I was terribly disappointed at the choices at Home Depot.  And the prices! Two lights at Home Depot would have cost about $150. These two with the pendant kits were less than $100. I'm happy to take the savings, thank you.


Take a look at before and after!

Already, the finial photo is out of date, our new refrigerator arrived today! And with that, this particular project is done!! We're hoping to do the pantry expansion over Labor Day weekend, which will be Stage 2. After that though, we'll be in waiting mode until we purchase all new cabinets and determine what the counter tops are going to be. Baby steps...

Same Story Different Day

The Builder and I were watching HGTV the other night (he'll tell you it's the only channel I watch - not true, I just love Property Brothers, Rehab Addict and Fixer Upper...well, and Sarah's House and Candace Tells all, but those two don't have new episodes anymore, bummer!!). You know, any place I can get ideas! 

Anyway, Fixer Upper was on and they opened up a wall and found water damage. And The Builder informs me he's afraid that's what he's going to find when he opens up our master bath shower. What? OK, there's a small hole along the baseboard on the outside of the wall, but it could be anything. Right? All he does is look at me. Yeah, probably not anything. Probably more shower tile that the grout is now leaking like it did last year in the kids bathroom upstairs. You know, the one that still has the temporary vanity and no bathroom mirror. Yeah. The Builder also informs me that since that's a load baring wall, we need to open it up and check sooner rather than later.  

Don't get me wrong. I am beyond ready for a bathroom update.  Take a look at what I currently have:
This shower is 34 x 30. A tiny shower. And look at those glass blocks!!!! I've seen other houses in the neighborhood - it's not original. Someone, at one point, chose to put that in. They were also leaking when we first rented the house but The Builder came in and put clear silicone over the grout lines. Overall, it's a functioning shower (and remember, this is the shower six people shared when he was renovation upstairs!!) but there is nothing about it that says master bath. I've also indicated where it's leaking (that we know of!!) which isn't apparent at all from the shower side. But take a look at the wall on the other side:

The stairs are to the left and the right opens to the dining room. That right corner is also load baring. Thankfully, we don't see any damage to that beam. This, in comparison to the upstairs bathroom, is mild. We've cleaned it up to leave it open to dry out for now but 4th of July weekend, we have plans to start our next renovation.


Here's a close up of what it looks like:

Yuck.

I swear, the hole was small. Like someone kicked the wall by accident coming downstairs (yeah, I don't know how you kick a wall by accident, but I have boys, so it could happen!). The Builder brought out his sawzall to open up the wall....but, it wasn't needed.  He just barely tapped it and it opened right up. No question is was water damage at that point. Might I add, this is the first thing you see when you enter my front door. Giant gaping hole. Fun. 

So, what do you do when faced with this dilema? Fix it and be done. A few new pieces of drywall, re-seal the grout, replace the hardy board. A true weekend project. So that would be the easy thing to do. We rarely do the easy thing.

As you can see in the first photo, this shower is ridiculously impractical. There isn't room for a single shampoo bottle or bod wash. I can't tell you the last time I bought a bar of soap. We're a body wash type of family! I've been on Houzz and I'm seeing a trend towards "shampoo niches" so this is what we're going for. The other thing we opened up was this weird spot in our wall that we thought might be part of the load baring beam. It houses the ONLY electrical outlet in the entire bathroom (which is the vanity that The Builder claimed, of course). 

Yes, it's really a two plug outlet. Enter my hair dryer, his electric shaver, my flat iron, my electric toothbrush, my curling iron, my hot rollers...at the very least, we should each have an outlet, right?! And you can see that this is about 10 inches off the wall.  It makes no sense whatsoever. 

So we have a plan.

The short term goal is to move his vanity to the right by about two feet. This will allow us to extend the shower to 54 inches wide. 34x54 is actually a normal sized shower (not super big, but almost double the width we have now). We have found shower pans online, which we won't be able to use since we are not moving the drain, but this will allow us to get rid of the hideous glass blocks and put in a standard glass shower frame. Since we're moving the vanity and the power, we're going to run power to BOTH vanities. Novel concept, right? "Eventually" we're going to build a new double vanity.

Right now we're picking out tile for the shower, which I think we've made a decision on, and pricing shower doors. I wanted a seamless glass frame but that may not be cost effective.  

Here's a few ideas for my inspiration
Traditional Bathroom by Etobicoke Design-Build Firms Design Excellence
This is about the size I'm thinking the final shower will be.  See the shower niche in the wall?  Love it! Practically speaking, we won't be tiling the ceiling, but it is lovely.

I like these vanities, particularly the bump out with the extra storage:
Traditional Bathroom by Edina General Contractors REFINED LLC

And since we're going to be opening up the wall on my side to run additional power, might as well go all the way and add some pretty shelving:

Traditional Bathroom by Clemson Architects & Building Designers Studio 511

I'm working on the final design board now. Stay tuned!

When Last We Met...

It's been almost 8 weeks since my last post.  YIKES!  I wish I could tell you that all my projects are current and up to date...but I can't.  Here's where we stand on outstanding projects:

  1. Upstairs bathroom - I don't have the new vanity built.  I have about half the supplies bought to build it, which is a good start, but it's not finished.  Neither is the mirror.  We built the frame and the first coat of paint is on it, but it's not finished nor is it on the wall.  Sigh.  No towel racks or hooks yet either.  But it is technically a functioning bathroom.  Yeah, that's all I have there.
  2. The Teen's room - this one is 90% done.  I finished repainting her dresser, the nightstand, and all the new hardware is on the furniture.  The Builder got the sconces hung, but we discovered the chord is an eyesore so we're debating hanging it behind the wall.  Which means more drywall repairs.  Her ceiling fan and light are in and the electrical is done for the double light switch, but it needs to be textured, painted and the cover plate put on.  We also bought new outlets for most of her plugs since someone had painted over them (really, why do people do that?!) and I have all the artwork.  Oh which none is up on the walls.  A solid afternoon working in there and it will be done.
So in the face of two not done projects, what did I do this long weekend?  Yep, I started a new one!  In my defense, this one smacks you in the face every time you drive up to my home.  It's my yard.  Last year The Builder and I got in and put in fresh mulch, managed to get the lawn green and full again, and got our flower beds in order. We even added some new plants to add a splash of color, including two hibiscus trees and some decorate pepper plants. All of which died the three hard freezes we had this past winter (it's the tail end of the deep south, we're not supposed to have hard freezes in the winter, let alone 3 of them!).  In addition some of the other plants that were already there also died.  Of course, not the two ugly sego palms.  Those just won't die.  Our tomato plant that was in the sun room also died.  It was just not a good winter for plants! So Saturday morning we headed out to our local farmer's market to get some new herbs for our garden, and then Home Depot for potting soil.  Score on the potting soil, it was 4 for $10.  We bought 8 bags.  And an heirloom tomato plant, a heat tolerant tomato plant, and some flowers to start filling in the garden again.  Here's a look at the side of the garage that leads up to the house:

I refuse to pay the more expensive prices for bigger plants. It will take longer for these to fill in and we still plan to add more, but this section was completely barren of anything other than weeds.  We'll add some taller plants as these fill out a little.  We also go our salsa garden going:

There are two tomato plants (one heirloom, I'm super excited about it!) and two basil plants.  I love fresh basil in my food and these plants were $2.50 at the Farmer's Market.  I typically pay $3-4 for a small thing of fresh basil at the market, so this is an excellent savings in the long run.  I have plans to add a cilantro plant in another container, as well more herbs.  I need a jalapeno pepper plant too.  I'm very excited as fresh salsa is something my entire family enjoys.

We also took the time to inspect where the sprinklers are.  The good news is that overall, they work.  A few need new heads on them as they're leaking a little, but this summer we won't be watering by hand.  And yes, this is technically another unfinished project.  But it looks 100% better than it did  and that's it for this long weekend.


Moving On

My bathroom is 85% done and on hold. We got that fabulous deal on the vanity counter top but we haven't started the build on the vanity cabinet. The problem is the cold weather (crazy cold for Houston!!) that The Builder hasn't had a decent day to be in the garage working. In addition...the garage was a disaster!!. We've done so many projects in the past few months that clean up after them has been minimal at best. We The Builder took some time last weekend to clean it out and organize and we're ready for a project (the weather is beautiful right now)...but not the vanity. We either want to build from scratch, or find the right sized dresser and do a project. But we haven't made a final decision so it's on the back burner, as is the room reveal.

So I'm moving on to the next project! And not a small project. No, that would be too easy.  Here's the idea board:
This is going to be The Teen's room.  We have never painted her room since we moved into the house three years ago this summer and the paint really shows it.  I have no idea why people use flat paint in bedrooms because it's not scrub able - but they do. This will be the last room re-do for her. She'll be going to college in a couple of years and then out on her own, so I wanted to make sure this room feminine but grown up at the same time. Here is the inspiration room:
Contemporary Bedroom by Elkton Interior Designers & Decorators Reflections Design Studio
It's lovely, and there are a lot of things she loves about it.  Including the pink color (still her favorite color since she was able to walk) but we ultimately decided to go with a more updated color palette.  Ironically, it seems we're leaning towards a color palette that includes Pantone's Color of the Year:
As you can see from the design board, we won't be going quite this...pastel looking.  Her room will be more of a grey lavender vs. the red lavender that the orchid appears to me. All the throw pillows will be DIY. I think I'm horrified at the cost of throw pillows. How do stores justify charging $50 and up for a decorative pillow that will be on her bed (or tossed on the floor, sigh)? So I've been using my Silhouette to design stencils to use on the pillows I'll sew up. The Teen is very artistic and I have no doubt she'll jump at the chance to get in and help me with them.

We also want to incorporate her love of her violin in her room. You can see on the design board the violin print on the book page. I bought it from this Etsy Shop. The knobs are from this Etsy Shop. I love how they coordinate the color with the theme. We have some major things to do in her room though. To start, there is no built in lighting. My boys have ceiling fans with light fixtures in their rooms, and while not as decorative as I might like, they keep the rooms cool in the summer.  But The Teen does not. She was using a torch lamp that got knocked over last year and broke and now has a wimpy little table lamp on her desk. In addition the floor fans she was using have slowly been dying as well.  So the plan is to install the wall lamps on each side of her bed, hooked up to a light switch in the room, as well as a ceiling fan for air movement.  Her dresser (the one my dad made me when I was 12 and graduating into my big girl room!) is going to get an update as well with new hardware (goodbye 80's blue flower enamel pulls and knobs). The inspiration room is bigger.  I won't be able to fit a desk that size.  The one she has now will have to work.  I may paint out the chrome trim to black to have the wrought iron look we're going for it the room.  But I may leave it as is.

We're actually have quite a few of the items bought and ready for the update.  I was hoping to have a good swatch for the paint color, but when I pulled it up on Behr's web site, it's not even close to the color on the color card, which we picked after we had the duvet cover. We've even purchased the mattress (yeah for President Day sales!) since she's moving from a twin to a double.  But we haven't built the bed frame yet.  I found this bed on QuirckyCool's web site:

I love the Eiffel tower on the footboard and it's definitely something I want to incorporate on her bed. I'm going to cut out a vinyl 'sticker' with my Silhouette so if she ever gets tired of it, it's easy to change out. We had contemplated staining the bed but her dresser is painted as is her bookcase. I don't want a mishmash of finishes. For the Farmhouse Bed from Ana White, the headboard is taller and more conducive to the Eiffel tower design, so that's the direction well be taking. Also I'm using a color called Bleached Linen from Behr for the paint color.  The bed, dresser, and nightstand will all be painted in the same white color for cohesiveness.

We also have plans to recess her bookcase for more floor space. The Teen has two narrow closets that are not connected but are next to each other.  The space between them? Wasted. Just an empty cavity. Clearly the home builder didn't design the room for a teenage girl! We could knock out the wall and carry the space through, but The Teen is a typical teen and clutter is a problem.  Recessing the bookcase in this cavity will gain a little more floor space with the bigger bed and The Builder can give it a custom, built in look.

Cost wise, I'm about $200 total into the project already.  That's the duvet, duvet cover, wall lamps, curtains (including lacy sheers and the wrought iron hardware) artwork and a couple of accessories.  We need to purchase the wood for the bed, which we've estimated to be $350. We're buying the wood a little at a time and The Builder needs to adjust the size from a Queen bed to a Double.

The Teen is on Spring Break in two weeks and the goal is to get her room packed and cleared out. We estimate that with the building projects (the mirror and nightstand are DIY projects as well - check them out on my Pinterest Board) may take up to three months to complete.  The smaller DIY projects will get done last so that she can move back into her room as quickly as possible.  Storage is a major issue for her.  She has a lot of art supplies and I need to maximize the space she's gaining with room re-do, so there will be some organizations projects as well.   As I said, not a quick re-do.  But I'm really looking forward to this one!

Bathroom Update

I realized tonight I haven't posted any updated photo's. Probably because it's not done and I've reached the point where I'm really ready for this to be done. 

But it's coming along nicely!  I'm waiting for the 30 days to be up to seal the tile.  I didn't put up the shower curtain because my boys would be tempted to use the shower, thus getting water all over my unsealed tile. Not happening. 

The smaller vanity makes this bathroom seem SO much larger!  We've decided to build a 36" vanity to keep the open feel.  We could put up to a 48" in, but it leaves little room for the laundry hamper.  I like having a laundry hamper in the bathroom so I can pretend my kids can easily pick up their clothes and toss them in the hamper. 

You can sort of see the new shower head, faucet, and handle.  Brushed nickle, so pretty!
Here's the vanity installed.

Yes, it's small.

That's not a bad thing!

For now it serves the purpose of teeth brushing and hand washing. As I mentioned previously, it will be going downstairs in the powder room when we're done in here, so the small size works. 

The new light fixture is installed, as well as a new light switch cover and a double plug outlet.  We did this specifically for our daughter and her many curling irons and hair appliances.  We're nice that way...

I still want to paint that tub.  Against the white tile and white toilet (which also got a new seat and cover) the tub does not look white.  We bought new baseboards as well, so those still need to be installed.

But it's all coming along nicely!

Score!

No pictures today, and just a quick post.  

This past week, a Habitat Re-Store opened up 10 min from my house.  I've seen some of my favorite bloggers, like Kristi at Addicted 2 Decorating score some great finds at one, but the only other one in Houston is in a very questionable section of town and not an easy drive from home or work, so it was on me 'one day' list.  Well the Friday after Christmas, The Builder and I were at the DPS and there is a new one right across the street.  It wasn't opened yet, but Saturday after I was coming home from lunch with a friend, I passed by it again, and it was open.  I decided to just take a quick peak and see what it was all about.  

Within 2 minutes, I found a granite vanity top that will be PERFECT for the vanity that The Builder is going to make to finish the upstairs bathroom.  I've been pricing granite, but at $425, I wasn't please about the overall cost.  And how much did I score my top and under mount sink?!  $75!!

If you're not familiar with Habitat Re-Store, they resell usable building materials at significant discounts.  It's a DIYer's scavenger hunt paradise and you never know what you might find.  You definitely need to have some creative imagination.  A truck to hall things off with helps too!

Photo's to come...

And Then There Was Grout...

SUPER busy few days here after Christmas!  The Builder worked double duty these past few days to get the entire bathroom grouted, both the shower and the floor.  What we didn't know before we put the grout in is that it's supposed to cure for 30 days.  30 DAYS!!!  Yeah, so this project is carrying on into 2014. It still need a good cleaning, but it's one more step done.

While the grout is curing, we got busy on some of the other elements in the room.  Like a light fixture.  Take a look at the current fixture, in all it's 80's glory:

I was at Lowe's today and they still carry this light fixture.  I can't believe that they carry it after 20+ years. STILL. Aside from the fact that it's inexpensive, just $20, who on earth would buy it?! I'm sure at some point in time, this was considered a modern fixture.  But I think it's hideous, and after all the effort we've gone to in updating the bathroom, this fixture was NOT staying.

You can see here where the cabinet was, the old mirror, and even the medicine cabinet that was in the wall.  We took it all out.  I've found a couple of different options to replace the cabinet that will keep it from looking so closed in, so we just need to decide what option will work best in here.  So that's still a work in progress.


I looked at several modern fixtures that I really liked, and all were similar in cost to what I eventually decided on, but ultimately, we stuck to a more traditional style.  The photo on Lowe's web site has an antique nickel finish (which I actually really like!!) but we got a standard brushed nickel to match the rest of the bathroom and the fixtures.  

Here's what we are installing:

Yes,  a vast improvement.  A tad more traditional than what I wanted, but The Builder liked it and it works well with our overall look, so we bought it.  

We also bought a bathroom vanity.  I know, just yesterday I said that we are building one.  And we are.  But that's going to take some time and I still have to order the vanity top. And at this point, we need a functioning bathroom, complete with a sink.  So while walking the aisles looking for some plumbing supplies, we came across this small vanity, which I thought would be a vast improvement over the larger vanity that is in the powder room downstairs:

The grand plan plan is still to build the vanity, but this will be what the kids are using until it's actually built.  And once the custom built vanity is in, we'll move this down to the powder room downstairs.  Because there's no way I'd waist money buying a temporary vanity that we'd only use for a month or two and then toss!

We bought a few less exciting things with a second trip to Home Depot as well. Molding for the baseboards, since the previous baseboards were unusable once we re-tiled. A new wax ring to re-install the toilet (did I mention completely unexciting items?).  And this bathroom faucet:
This fixture will be staying once the vanity is built. The powder room downstairs already got a faucet sink upgrade last year when we refreshed the room (kicking myself for buying a cheaper fixture, but who knew we'd be buying the house?!) so when this vanity goes back downstairs, we'll just swap out the faucets.

I don't want to drill holes into this vanity to install a toilet paper holder, so we also picked up this one from Home Depot:
Yeah, not exciting, and I'm hoping my boys don't try to turn it into a sword.  But that vanity is small and I don't want the toilet paper rolling around on the floor, so this was a practical solution.  And who knows, if I like it, may just end up staying! We shall see. 

We finished up the day by removing the light fixture and texturing over the spots that we replaced the drywall.  I would post photo's, but in order to remove the light fixture, we turned off the power to the bathroom.  By the time we taped everything off and did the texture spray, it was getting late and there wasn't enough light to take photo's.  The Builder plans to get up first thing tomorrow morning and put a fresh coat of paint over the entire bathroom. Then we'll install the light and the new electrical box (we're putting in a 4 plug to replace the 2 plug that never provided enough outlets) and bring the vanity up.  Then, just maybe, it will start looking like a bathroom again!

Pardon The Mess...

The Builder and I took the entire week of Christmas off to spend time with our family. :)  I convinced him that the day before Christmas and Christmas Day are non-work days, but we're itching to get this completed!

Monday was spent laying floor tiles in the bathroom.  I am THRILLED at how they look.  In fact I'm so excited, I'm going to show them to you without any clean up having been down of the grout being completed. You know, the stuff they never show you on the home improvement shows!


Yes, here it is, in all of it's dirty, unfinished glory.  Don't you love it?! Can you almost see the tweed pattern in the tile? I can't wait to mop it and really show how pretty it is.  I'm loving the tile pattern too.  On Saturday, I was watching one of my favorite HGTV shows, Property Brothers, and they showed a bathroom they did with a just a glimpse of this pattern on the floor.  And I KNEW I had to have it my bathroom!  In fact, I rewound it and waited for The Builder to come back into the room so that I could show him.  And he agreed that he could do something like that.  I just love that he humors me (because rest assured, he could care less about a staggered tile pattern on the floor!).  I missed taking photo's of the orange under layment that he installed, but suffice it to say, we will never have problems with a sub floor rotting out if the tub or toilet should over flow again.  Because gutting an entire bathroom down to the studs is something you should only have to do once in a lifetime...

Also in it's unfinished state, here's a peak at the tub/shower tile nearing completion:

The Builder is currently upstairs cutting all the finishing tiles for this project.  We tiled all the way to the ceiling (great way to find out your window and ceiling aren't plumb). The small, weird pieces in the photo are just so the tiles on the ends wouldn't sag while they were setting. Once the remainder of the tiles are installed, we'll be able to grout the entire bathroom and install the toilet. We've been using our microscopic master bath shower during this renovation for all six of us, and while the vanity hasn't even been started  this will at least give our kids a toilet upstairs again, as well as a functional shower. Priorities, right?!

Side note:  Have you ever priced bathroom vanities??  INSANELY expensive unless you want a cheap one coated in plastic - which I do not.  So The Builder has agreed to make one for me.  We'll still have to order a bathroom counter top and purchase a sink, so not a huge cost savings (is now the time to tell him what I'd really love order is a recycled glass top?!), but much better quality and will be exactly what we want, so no complaints.

I'm also debating taking the cabinet above the sink down and replacing it with floating shelves.  We've never really used it and I feel it makes the bathroom feel more closed in than what it is.  Ideally, I'd love glass floating shelves, but we shall see.  We also took down the monstrosity of a mirror that all builders install, and have plans to cut it down and frame it out.  Still on the list of things to do is install new baseboards (the old ones had water damage and additional damaged from the multiple layers of flooring that were butted up to them), take out the old in-the-wall medicine cabinet (more floating shelves are replacing it!) and a fresh coat of paint.  With taking out the vanity and mirror, you can see that this bathroom is on it's third paint color since the home was built, and it just makes sense since everything it out, to make sure it's all painted fresh.    The Builder also wanted to install a glass sliding shower door, but so far, I am resisting.  I hate them.  He's going for practicality.  We shall see...

Oops, The Builder saw me working on this post with the above photo and all the clutter in the tub.  He pointed out that while I was typing, he cleaned out the tub.  So at his request, here's a less messy photo :) :


Beyond Demolition

The Builder was indeed rained out last Monday and spent the day working on the bathroom.  But because I was at work, you won't find those photo's here today.  He rarely remembers to take photo's (probably because I'm always following after him with my camera, :) ).  He worked on Friday, but he was anxious to get back to our project today.  We're officially done with demo, hooray, and have moved on to installation.

Last night we headed out to Lowes to pick up the shower tile.  What marvelous and creative tile did we choose you ask?
Bad photo from Lowe's web site, but this is plain white subway tile.  Yep, plain white! (I know, the color looks similar to a bone or off white in this photo - it's not) OK, I love color, and there is a lot of beautiful tile to choose from these days.  But there's a practicality with white subway tile.  Should I ever get tired of my grey walls, or want to update the overall decor, white is an easy color to work with.  There was another deciding factor.  Cost.  These tiles are 22 cents a tile.  Roughly $18 a box.  We needed six boxes at basic estimate.  There were some other tiles that were very, very pretty.  But they were were $55 a box.  More than double the cost.  Since we've gutted the entire bathroom, I didn't want to break the bank on tile I might get tired of in 10 years.  So subway tile it is. :)

But we didn't go totally bland.  Check out the tile we bought for a mosaic border!

LOVE it!  There will be a four inch band about 2/3 of the way up, all the way around the shower.  This photo, again, doesn't do this tile justice.  Hopefully my camera will when the time comes to take photo's.  It also picks up the color from the floor tile.  

We also bought a new faucet set to replace the builder grade one that was showing definite wear.  The old shower head had a weird connector that wouldn't allow us to just change the shower head.  So we bought a brushed nickel set to modernize the bathroom.  Since we were going to buy a new faucet for the new sink and vanity.  If you give a mouse a cookie...sigh.

Here are some photo's of our progress from today!

OK, as I mentioned earlier, you're missing a few photo's since the last update.  Basically, the cement board is completely installed and the bathtub has been put back in place (The Builder doesn't want to re-finish it in the garage because he says it will get dust or grime in it before it makes it back up - and he's most likely right!). The Builder works with a lot of different trades, and one thing he's learned in the recent years is that you should skim coat your wall with the mortar before you install the tile. It creates a super strong bond, which is what you want. If you look at this photo, the upper right corner hasn't been skim coated yet.  I dragged The Builder downstairs today to put the lights on our tree when he ran out of mud the first time, and I snapped this photo before he could get the rest put on the wall.  Ahh, the trials of having a wife who blogs.

The laser level is The Builders favorite toy as of late. He snapped chalk lines on the wall so everything would line up correctly.  Having the tile square is essential!

Mixing the mortar.  OK, not a fun photo, but a quick shot of getting it mixed properly. Somehow The Builder has a tool that goes on his drill to mix things easier. Since tile isn't his trade, no clue how he got it, but it was certainly handy to have for this! The plumbing fixtures are from where the sink should be. Such a shame there isn't room for a double vanity here, but as you can see, there isn't a whole lot of space, and I'm not willing to give up all counter space for double vanities. Easier for The Builder though, since he doesn't have to split the water line.


Houston, we have tile!!!

I had to wait patiently for The Builder to put a few pieces up on the wall so I could grab a photo.  See, plain white tile, just as I said.  We didn't rent a tile cutter this weekend, as he wants a full weekend to be able to cut the floor and wall tiles, but he's putting as much up as he can without the cut pieces.  Much to his horror, I made asked him to stop after he had one box up. It's clearly not all going to get done this weekend so there's no point in pushing it. He's worked a lot of hours the last few months and he's work until midnight if I didn't say something!

But look, it's tile!!


And here is where we stopped!  Love, love LOVE the simplicity of the white subway tiles. The old square tiles screamed 80's to me so this will update the bathroom nicely. Hopefully it will remain a classic! The plan for tomorrow is to finish as much wall tile as possible, and if we're really lucky, lay some of the floor tiles as well. Which means purchasing the underlay for the floor. Then we hope to rent a tile saw next weekend, and finish it up.

Still to do:
Tile the floor
Build the vanity
Buy a vanity top
Install new lighting
Re-install the toilet
Install new towel bars
:))

Demo Day 2 & 3

We managed to get a little work done last Sunday, but I hadn't had a chance to post any updates.  Behold, the vapor barrier replaced:
Yes, all the black yuckiness (blogger doesn't like this word...but it works for me!) has been removed and you can see the tape from the clear vapor barrier.  As I mentioned previously, the vapor barrier was the only thing that protected the hardy board that is on the outside of our home, so we didn't want to skip this in our repair work.

As you can see, there is almost no support under that window!!  The window is cauked into place, but really, I'm so thankful we found out about the damage before we really had a problem on our hands - you know, like the window falling out of the wall and the wall coming down...maybe over imagining on my part, but definitely a possibility.


Ahhhh, much better!

The pink studs make it really easy to see them.  We used all the boards we bought, and now I have no worries that the window will come crashing down.  We filled the space that opened to the attic as well.  You can't actually get to the bathroom from the attic, and once it's tiled, it serves no purpose.  So The Builder sealed it up.

Side note - my daughter is thrilled to know there's pink studs in the wall, even though she knows they won't be seen.  She cracks me up!

We need to put in the insulation and figure out if we need another layer of vapor barrier.  The Builder is concerned about breathing holes so the new isolation doesn't get worried.  More on that in another post.

I knew this wasn't going to photograph well, but this is the best i could get.  Floor tile!!!

I mentioned we had to rip out the tile around the tub and subsequently found out that the existing tile was laid over the builder grade linoleum, leaving us no choice but to rip it all out and start over.  So I've been looking for the right tile for about a week now.  And this is it!  

It's hard to see, but this is almost a tweed pattern on the tile.  It looks fabulous with the wall color (that we're not changing) and to seal the deal, it's on clearance and cost a fraction of things that I liked a lot less. Bonus!!  It has a hint of the wall color in the tile which is perfect.  We had to go to 2 different Lowes to get enough, but it cost me less than $100 to replace the tile.  The underlayment is another $85, so about $200 to replace the floor.  Really, not a bad deal since we're not going plain jane on this! And with new baseboards painted in a crisp white, I think it's going to look good with the shower curtain we have that again, I'm not replacing (...I don't think...sshhh).

And here it is stripped!

Our original thought was to replace the bathroom vanity with a double sink.  Unfortunately, I only have 48" for my vanity, and most double vanities are 60".  The Builder could do something custom (and we're still debating on doing that) but it would mean little sinks and no room to put things on the counter.  I don't think that would work well for us.  We found a vanity at Lowe's that we both love, but it's pricey and heavy. Reviews show it to be 273 lbs. - and we'd have to get that up two flights of stairs.  We can go cheaper, but I don't like the choices as much, so we may still end up building a vanity.  Anna White has one (of course!!) that I think would look great, and after reviewing the plans, The Builder said it would be fairly simple to build.  We just have to see if the cost would be comparable to buying one.  We shall see on that one.

We spent the rest of day 3 hauling out the debris (remember the two flight of stairs!).  The toilet and tub will go back in once the flooring is done.  We bought the plywood to replace the sub-floor in the tub area, but The Builder worked again this past Saturday, so that isn't finished yet.  He may have a rain out day on Monday, and if so, I suspect quite a bit of progress might get done!

To do still:  put in the new insulation, install the cement board, replace the sub floor, re-tile, buy/build a new vanity, tile the shower, replace the shower fixtures, replace the light fixture.

Demo - Day 1

The Builder and I have both been working crazy hours, and so the renovation of our guest bathroom had been put on hold.  This weekend he had two days off and wanted to make some progress (we're still wanting it done by Christmas!).  And so he started removing the tile so we could replace the cement board.  

You know those home decorating shows where they always find more problems than anticipated?  Yeah, that seems to be the story of my life.  Upon taking down the first portion of tile from the back wall, we discovered the 2x4's were completely rotted out.  
Those black and disintegrated things?  Those are the wall studs.  Almost nothing was holding the window up!!!  Also the insulation was completely rotted out as well.  Fun times.  So we made a morning run to Home Depot to pick up a few supplies:

The Builder estimates we'll need about eight 2x4's, so we bought 10 to be safe.  New insulation.  Gloves. Cement Board.  And a reciprocating saw, which he claimed to need.  And really, what's a home improvement project if you can't buy a new tool or two?  Yeah, so we got that too.

The bright pink 2x4 studs?  Those are treated lumber, and lower in cost.  Since they'll be hidden by drywall, we went for the cost savings.  

The demolition process it self has been quite...interesting...


Tearing it all apart...
                                                                                                                                                                 
The tile in the shower? They used linoleum glue to adhere the tile. Yes, the same glue that the linoleum floor (that's under the tile you see in this photo) has. NOT intended for shower tile!! We literally pulled this chunk of the wall off with no effort.

The only thing that saved the hardy siding on the outside of the house from getting destroyed was the vapor barrier.  We continue to be amazed at the shortcuts we find that builder take here in TX. This tile was not part of the renovation the previous owners did to the home. It's original. Yes, it makes me nervous to think about things that we can't see!

A little more on that...
Speaking of things we couldn't see. The tile floor. We needed to remove the bathtub to replace the 2x4's so we had to cut back the drywall and remove some of the floor tile to  pull it out without damaging it (I'd like to not have to buy a new tub, thank you very much). What we discovered was that there used to be a builders grade linoleum floor in the bathroom. Instead of removing it and laying new tile, someone laid a thin layer of cement board over it, then tiled over that. That's why the moldings were covered up and narrow. We also discovered that the sub floor around the tub was weak and spongy.  Considering how much water was leaking, we weren't really surprised. So now we're going to rip out all the tile, replace the sub floor, and re-do the floor the way it should have been done.


So the tub and shower are out!  Next up is replacing the 2x4's first.  Then we'll have to remove all the tile, replace the sub floor, install the cement board on the walls, replace the drywall, re-tile the shower (all the way to the ceiling), and re-tile the floor. We're also going to take out the old medicine cabinet, update the lighting and bath fixtures in the shower, and if I'm really lucky, replace the vanity and make it a double sink.

I'd love to say that this is a two weekend project - but it most definitely is not!  My hope is that over the long Thanksgiving weekend, while I am out completing my Black Friday shopping and Christmas decorating, we'll manage to get the first half of the list completed.  And maybe, just maybe, it will be done in time for Christmas!

Changing Directions

My bathroom and water woes?  Not even close to being done.  I called my homeowners insurance today, but after our deductible, we'd pretty much break even.  So right now, we're letting all the water dry out and then we'll do a more thorough examination to the water damage.

So, what to do in the mean time, right...?

There's no time like the present to finish updating our master bedroom!  You may remember this post.  I was really happy with this when we were done.  I still love most of the aspects of this room.  But the duvet is SUPER warm - too warm for anything other than winter.  And now that we own the home, I wanted to update the paint colors.

But.  I'm only revealing a sneak peak today.  I waited until it was dark to take photo's, which is always a mistake.  So rather than a bad room reveal, here's just a tease!

The chair is new (fabulous deal at Wayfair.com!) and I bought the coordinating fabric at Ikea to make the throw pillow.  There's a second pillow I made as well, that's going to go on my bed
My pillow isn't so bright in person.  It's a dark, plumy purple.  The inspiration pillow is $58 at Anthropologie. Yeah, even if it were to go to $20, it's unlikely I'd buy it.  I spent $3.50 on my fabric (and have plenty left over to make 1 or even two more pillow) and the pillow insert from Ikea was $5.  I did put a zipper in my cover, only so it could be washed, but you could easily skip that step if you're not comfortable inserting zippers.  You can find the instructions on Sew HomeGrown.

And to add to my master bedroom update, I've decided my creative work space (aka, my master closet) is due for an update too.  I haven't touched it since we moved in, but I'm in desperate need of organization solutions.  Another sneak peak:
The painting is mine.  As in I painted it.  The only painting you will ever see from me!  My painting is staying, despite the hot pink.  This room is going to get painted the same grey as the bedroom.  I don't care if it's hot pink (a color I detest) Or maybe a shade lighter.  

My sewing table is very important, but I could use better lighting.  What you can't see is the boxes of fabric shoved in the corner to the left.  Or the rows of clothes on each side.  Yeah, this space needs help...

Hall Bath Inspiration

As I mentioned on Sunday, it's only matter of time before the hall bath gets an upgrade.  The Builder and I figuring out the budget, timing, and completion dates.  It looks so much fun on the HGTV shows I watch...not so much fun when it means I'm footing the bill and providing the labor!

Here's a peak at our design inspiration:
Some of the things are easy, because I already own them. The walls are already painted in Silver Screen by Behr.  The striped towels and the shower curtain are also already in the bathroom.  Remember, this was not a project I was planning to take on this fall!

The bathtub is a necessity.  We've gone back and forth on full tub enclosure vs. stand alone tub.  The tub will require that we re-tile.  We've got builder grade tile, nothing impressive, and it's actually worse for the wear at this point.  However the tile I like is more than the bathtub.  Actually, any tile we like is more than the tub. But I hate to buy a tub enclosure if I don't plan to use it long term - and I'm not sure I can bring myself to install one at all.  I think they're so ugly!! 

The sink, from Ikea, is a wish list item, bit since we have a vanity and sink that work, it most likely will wait.  I like the shape and that it's wider than our current sink.  But it would require a new vanity as well.  

The mirror is actually a need.  The current one is flaking and worn at the edges.  This one is from a home improvement store, but I have to tell you, I would never pay $90 for a mirror, let alone two.  So The Builder will order a piece of mirror at work and make a frame for it, like he did in the powder room downstairs.  

Stay tuned!