Showing posts with label Crafts. Show all posts

Thinking Fall...

Living in TX, fall isn't a season we really experience. Neither is winter (except when we have ice storms that shut down the entire city...) But I love fall.  The colors, the scents, the cool weather. Yeah, it's wishful think, today it was 85 outside. 

That hasn't stopped me from dreaming about fall. My living room has been recently decked out and so I was ready to put out the wreath I made last year. Only to find out it broke in the closet some time over the past year. So last weekend I set about making a new wreath. I'm pleased with final product.
For me, less is more. So as a rule, my wreath's don't have a lot of "stuff".  And I'm ok with that!

One more angle.
It almost makes up for having the ugliest door in the neighborhood.  But that's a post for another day...

Fall Decor Updates


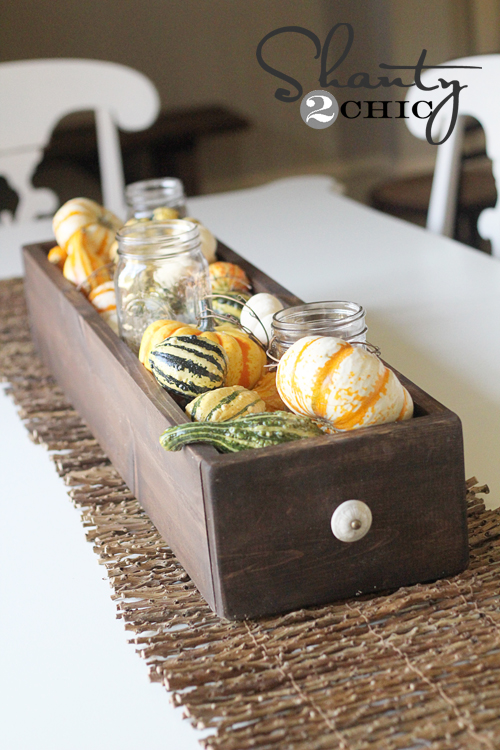
Shanty 2 Chic's Fall Table Scape
So even though fall in Texas is almost non-existent (I promise, my electric bill shows me summer is still going strong every September!) by mid-August, I'm ready for the cooler weather and a change of scenery.  I've been stalking browsing Pinterest this week, and it's clear I'm not the only one who feels this way!  I love my tiered cake stand for Spring and Summer, but I was ready to switch that out too.  Last year, I pinned this on my craft board:

So cute, right?!

My Version
I wanted to combine it with a candle votive idea I also found on Pinterest (which I thought I pinned but now can't find to share!) and then some cute Fall fill I found at Hobby Lobby.  I followed the directions on Shanty 2 Chic ...for the most part. When I stopped in to Lowes, I wasn't in my mini van. My car does NOT hold building supplies as easily as my mini van! Since I was already out running errands, I didn't want to go home and switch out cars.  So instead of the two wood pieces that the directions tell you to purchase, I bought some pre-cut pieces that would fit in my car easier.  This resulted in my table box being 36" instead of the 30" in the directions.  Because I'm too lazy to cut off the six inches.  I can live with that.

Since I was already at Lowe's for the wood, I went ahead and purchased some handles while I was there.  I might have gotten them slightly cheaper at Hobby Lobby, but I really liked the ones I found at Lowe's, and $2.97 per handle wasn't going to break my budget. The web site estimates the cost of the project to be $15.  I spent $21.  It would have been more if I hadn't had finishing nails, wood glue, and stain already in my supplies.  I don't know if those items were figured into the overall cost on Shanty 2 Chic either.  When I go to my favorite decor stores - Kirkland Home, Home Goods, Kohl's, or World Market, all of their decor items are significantly more.  I'm happy with my $21.


But my center piece wasn't the only project I've been working on.  My living room got a do-over this year too.
Last year, the wall color was darker, the TV was still over the fireplace, and my sofa was divided.  Do you remember this post? Last year was a step in the right direction, but looking back, it wasn't...done.  The brown vase is back on the mantle, but the pretty jewel toned one is the dining room. The TV is off of the wall above the fireplace, which lets me put real decor up, not some vines (although vines are what worked best last year). The flower vase on the hearth won't be staying, I just having figured out if it's staying in the room during fall or if it's going to be tucked away until after Christmas.  I really think I'm leaning towards put away until after Christmas, because it seems to spring like to me.

After many tries of re-arranging the sofa, this is the one that works best.  You notice there is no longer the big blank space above the sofa as there was in the last post!  It's not done yet though.  I have a lot more photo's I want to hang up.  Some of them need new frames, like my parents wedding photo (the frame is falling apart).  Some of them need new mats - like the picture of my son at the Long Beach Aquarium.  Some just need...frames!  So the 'holes' are left intentionally as I fill them in with photo's.  And I love that the TV is no longer the focal point. :)


I completed a fall wreath this weekend too, but the initial photo's were blurry, and it's too late to take new photo's.  So more for another day...


Egg-asperating!

The egg saga continues...
So coats one and two of the spray paint worked great.  But when I went back the following day to do  some touch up where the color was bleeding through, my paint started crackling!  Like instantly.  

The Builder asked if I shook the can well enough as this is apparently what can happen.  Umh, YES!   I do know a thing or two about spray paint.

I have to say, I was pretty upset at first.  I mean look at that crackled mess!  And all the eggs I touched up are like this, but I didn't need to touch up all of them (does that make sense?!) so  there's not necessarily a uniformity to them

But you know....real eggs are actually all that smooth.  They actually have a subtle texture to them.  And while this is far from subtle, I think with a little speckling, these may actually just do the trick...


More to come...

The Great Egg Caper

You know when you see the perfect project.  You admire it.  You think about it.  You realize you could absolutely do THAT project and it would look fabulous in your home.  Yes, I have many of those 'ah ha!' moments.  My problem is that I always feel the need to make the project my own.  So with that for shadowing, let's start with my latest project

It's an egg garland.  Made from brown eggs.  Seriously, how much easier could it get?  I have certainly blown out eggs before.  We actually eat quite a few eggs in a week.  No issues with eggs.

My journey began with my quest for brown eggs.  You may have noticed from my last post with the table runner, I'm going for a more natural feel for Easter this year.  So I figured I would just buy 5 dozen brown eggs at Sam's or Costco and call it good.  Or...not.  Neither store carried brown and the minimum to buy was 15 dozen at Sam's.  Yeah, I don't need that many!!  Second, only my local grocer sold brown eggs, and at $3.50 a dozen, it was quickly adding up to what my egg garland could cost.

Then I have a light bulb moment.  I would simply tea dye my eggs!  I've used tea or coffee to stain many things before, and I find natural fibers dye the best.  Eggs are natural, right?  So this is what my first dozen looked like:

NOT pretty.  Certainly not anything that I would want to hang up every year.  And blown eggs are so delicate!  While I do store my holiday decor in plastic totes, it wouldn't take much for the egg garland to get smashed and broken.

Not willing to admit defeat, I thought about a few more options.  Like papermache eggs.  But I'm feeling pressured on time to make them (and I was worried they'd look homemade!) and I couldn't find any local that were what I would consider to be an affordable price.  Back to the drawing board.

I was at Hobby Lobby today exchanging bias tape when I remembered a wreath I had pinned.  I seemed to recall that she just spray painted plastic eggs to match her decor.  Could it really be so simple?  I have a ton of eggs I bought after Easter last year at Target on clearance.  My only concern was that my eggs are small, and I thought maybe I might want some a little larger.  So I picked up a couple of packets of medium-ish sized eggs, a can of paint, and headed home.
Oh. My.  Some of these eggs are BRIGHT!  I didn't think the first coat of paint did much, until I saw the top photo.  Ok, so that's toned down.  But still not neutral creamy-tannish color I'm going for.  Clearly, it's going to take several more coats of paint to get them where need them to be. I've already added second coat as I write this blog, and they're looking...better...still not quite right though.  I'm hoping the third coat is the charm!  Well, then there's the speckling to do as well.  Because I need brown speckled eggs for my garland, right?

To add insult to injury, this is what's hanging on my front door:

I didn't even bother to edit the photo, it's such a pathetic excuse for a wreath.  So I need these eggs to come out as I'm picturing them in my head to save me from total egg disgrace!

More to come...

Holiday Decor

Do you decorate for all of the holidays?  Because I don't.  Christmas is The Big One for me.  My whole house goes Christmas.  I have neither the time nor the energy to do every holiday the way I do Christmas.  But this past year, I've found myself doing little projects to add a touch of the holiday.  Like this one:
You may have seen this wreath on Pinterest.  That's where I saw it.  And I instantly like it.  Completely different that both my Christmas and Valentine's Day wreath, and not...cutesy.  I didn't really want something overdone.  I wanted something more simple. 

The gottcha for me was that my inspiration wreath was small.  Very small.  The poster used a coat hanger for the form (side note, all of my hangers are white plastic - do people really just keep wire hangers laying around the house in case they need a project, and better yet, how often do they actually go to the dry cleaners to have said supply?! I digress...)  OK, maybe not small if you were putting it in the house, but I knew I wanted mine on the front door.  And as you may have noticed previously, I have a window in my front door.  Sometimes I use the wreath as a privacy screen (because it actually creeps me out that anyone can walk up and look into my house!) but other times, I want it to frame the window - the way it does with this wreath.  Also, my inspiration wreath used scrapbook papers for the color.  I loved this idea and even went out and bought the papers to do this.  Then I realized I needed double the number of clothes pins that were noted in the directions (double the size, double the clothes pins!) and realized that cutting all those TINY strips of paper and modge podgeing them onto my clothes pins was not something I really wanted to do.  WAY to much work for me!  So I headed back to the craft store and came back with bottles of paint in four colors.  Then I randomly painted clothes pins (that I had already attached to the wire wreath form!) until it was completely filled in.  If you are OCD, this would probably not work for you.  And while I am very OCD in some areas, this is not one of them.  
Currently I have two picks I got at Hobby Lobby.  I'm not sure they're working for me.  I bought ribbon that I can make a bow (like the inspiration) and I may do that too.  But for now, I'm good with this.

Supplies:
  • wire wreath form 
  • 100 clothes pins
  • 4 colors of craft paint
  • patience to space out the clothes pins properly!

Catching Up

This time of year is always crazy busy for me.  You'd think with the kids back in school, I would have a little more free time.  Let me clear up that misconception!  School activities definitely take some creative schedule coordinating when you have four kids!

But today The Builder is working and I'm fairly certain I can squeeze in one or two small projects while I attempt to conquer Mt. Washmore (aka, laundry for a family of 6!)  Here are two of my inspirations:

I love apothecary jars!!  I could have them multiple rooms, but since I have boys, and things "accidently" get broken fairly easy, I've limited them to the kitchen...

And the slightly more ambitious project:

I have everything I need for the wreath! I love that it's different than anything I've hung on my door before.  I think I'm going to need a second storage box for my fall decor after this year...

My other goal is to finish the table runner I started two weeks ago.  Yep, super ambitious if you could actually see the size of Mt. Washmore...

Another Weekend Project

I know, it's Tuesday, but here I am contemplating a weekend project.  That's because it's a craft project, and a Valentine's Day one at that.  You may have realized already that Valentine's Day is a week from today but that hasn't stopped me from wanting a few more things to decorate my house with for the holiday.  And I have to confess:  I've never really decorated for any holiday other than Christmas.  Oh, I have a few token decorations for my dining room, because I like table runners.  And just one decoration in a room for a holiday looks silly to me.  But aside from a few miscellaneous things?  Nope, no real holiday decoration.

For some reason, this year is different.  Don't ask me why.  Maybe it's all the incredibly talented bloggers that I avidly follow, that have inspired me.  All I know is, I have to make this project before the weekend is up!!

Didn't she do an amazing job?!  I'm always SO impressed with the creativity of other, and even more important, how willing bloggers are to share their amazing ideas!  So make sure to check out My Sister's Suitcase for her tutorial on this awesome project.

Christmas Crafting

The only decorating I've been doing these past few weeks is for Christmas!!

Christmas is my FAVORITE time of the year.  I like to decorate any room I can get my hands on.  Each year, I try to add 2-3 new things to my overall look.  This updates it a little, keeps the cost low, and let's me remove things that may have become dated or no longer match the decor.

This year it's a little more challenging.  As you may recall, I changed my color scheme in the family room.  Originally, I was going to buy all new ornaments to match the new color scheme, as well as add some new pieces.  I also need to buy a new artificial tree, as mine finally died last year.  Except all new ornaments gets quite spendy.  Add the new tree, and it would have been several hundred dollars to get the look that I was really going for.  Which I don't have.  So, I took down my artwork and things that gave the room it's new color palette, and put up all my stuff from the formal living room.  The snowmen theme we used in the den last year has been moved to the powder room (we don't have a den in this house).  The nutcrackers have been dispersed between the dining room and family room, and it's really the kitchen I'm concentrating on updating.  

Yes, I said the kitchen.

Apothecary Jar Inspiration 
This room I can make the most changes to for the least amount of money.  I don't think I've posted pictures yet, but the color palette in there is black and white.  White counters and cabinets, black appliances, and white wooden blinds.  I got lucky, because this matched my existing decor really well.  I put up my black wrought iron roosters, hung up my red valances from our CA house, and even had room for my black wrought iron bakers rack my best friend gave me several years.  We have a glass and wrought iron bistro set picked out at Garden Ridge for the bay window area.  These are all things I can't really change, so I had to think about how to make it more Christmas-y.  I started with red poinsettia garland that I've had for awhile.  It was easy to drape it over the windows (I love command adhesive hooks to keep it where I want it!!).  I then trolled surfed the internet for ideas for my apothecary jars.  That was a fairy easy design concept to find. I bought some inexpensive filler at Michael's on sale to fill the smaller jars, and I have the Christmas bulbs to use on the larger jar.  I even have ribbon that I bought some time in the past to layer with if I choose.  You can see the inspiration picture above.  

Satin Ribbon Wreath
I also knew I wanted a wreath of some type.  Not a garland wreath though.  I knew that wouldn't match the modern look I was going for in this particular room.  I found this wonderful satin ribbon wreath on Bliss Bloom Blog and new it was exactly what I was looking for.  She gives excellent directions on making this, and it's on my to-do list for sometime in the next two weeks. I see myself using a lot of 40% off coupons for Hobby Lobby over the next few weeks, so that I can stretch my budget.  Did I mention that I allotted myself a total of $100 for new holiday decor for the whole house?!  So I definitely need to stretch every single dollar...

I have two more projects for the kitchen, and I think I'll call it good for this year!  The first is some small Christmas trees to put on my bakers rack.  I have MANY ideas on this one, so I'm not sure yet what's going to make the final cut.  Definitely two trees will be made from some red toille fabric and some black toille fabric.  I think I need a white tree to balance that out, and I found some great ideas.  I want everything to have that clean and modern look to go with the black and white, so I'm trying to avoid anything that has a country look to it.  Keeping in my that clean look I'm going for, I found these on modern nutcrackers on a web site this week, that I love.  Very different from my ample collection, and I really like how it would carry the look from room to room, even though the color scheme is so different.  Again, I take no credit for copying on these.  I found the link and the directions for these on Bliss Bloom Blog as well.  I'm going to mix it up a little by painting them black, and accenting them with silver.  I have three unfinished nutcrackers I picked up at Michael's (all their unfinished crafts were 50% off this week!) this week, and one in my collection that was damaged in the move, that I'm going to use for this. 

I'm very excited about these projects!!  I plan to have the nutcrackers and the tree's completed this weekend, so stay tuned for some photo updates!


How to Make a Paper Flower Centerpiece - CraftStylish

How to Make a Paper Flower Centerpiece - CraftStylish

I plan to make some of these to put in a window box on my ledge. My local party city has crepe paper in every color imaginable!

Fall Updates

Recently, I came across a neat web site.  I say neat, because they have some beautifully decorated rooms and accessories.  But more than just a little out of my budget.  So when I came across these and I could see them in my den I knew they were exactly what I was looking for.  The thing that got me was that they are $125.  EACH.  Oh my.  So, while my friend Miranda was out visiting, I decided to hit my local craft store (and I introduced her to Hobby Lobby - who doesn't love Hobby Lobby?!)  

So, here are our creations!

Miranda did the white pumpkin and I did the orange.  I ran out of the crystals, so I plan to rub back this week and pick some up because I really think it needs one more pumpkin (I like groupings of three) and my pumpkin needs more twirly vines, but overall, I love how they turned out!