Featured Slider

Laundry Room Update

18 months ago, I wrote a post I never published, on refreshing my laundry space. I was aware at the time it was looking tired and old compared to the rest of my home.  However, I was crazy busy at work and never got back to it, let alone starting the refresh process. The post is still a draft.  

You may recall when I first updated it, it looked something like this:


The tile would have been the refresh, as I already had the washer and dryer, a cabinet (not the one pictured), the countertop and mat. We never did decide on a paint color, so it's still the same pale blue we painted it when we moved in 10+ years ago. 

However, over the last 6 months, my beautiful red machines have been having issues. We've made several repairs ourselves, but after the last one, neither machine sounds like it should. They both make rattles and squeaks that leave us...concerned. And while we are down to four family members living at home, the thought of going to a Washeteria (yes, that's what they really call it here in Houston!) to do loads of laundry isn't even close to appeal.  A local home goods store that sells appliances had a 30% off sale on LG this past week, and we decided it was time to invest in a new set.  We love our red LG units, and I was really hoping to get another set, just updated, but either they don't make them, or this store doesn't carry them.  So we went with something completely different in both style and color. 

We quickly realized that we need to update our laundry room. The sleek new appliances in the dingy laundry room look terrible. Also, we had to take the cabinet down because we now have a top load washing machine and the lid couldn't open all the way. When the cabinet was down, you could see EVERY anchor in the wall from the multiple changes we made over the years before we bought the cabinet. Apparently, we took the easy way out and just let the cabinet cover all those holes instead of filling them...oops. 

So over the weekend, out came the folding shelf, which also no longer fits (and more wall anchor holes!) the cabinet, and the drying rack. Sigh.  We have the machines plugged in because we have to do laundry, but I let myself really evaluate the space to make some long term design choices. 

  1. No more folding table.  This sounded really practical in theory, but all my kids did was dump the clean laundry on the table from whomever left it in the dryer, so they could dry their clothes. This became a vicious cycle of getting dressed in the laundry room, and it looked super cluttered because it's a stupid small space to begin with. 
  2. Tile backsplash. I already knew this was something I wanted to upgrade, but I had never made a final decision, and now I'm glad I didn't. I would have based it around red machines, making my choices very neutral and limited. I've already picked the tile, and it's NOT neutral!
  3. Storage. This is huge because the cabinet is gone, and there's no shelf for my laundry soap, fabric softener, or paper items that I was storing in the cabinet. 
So after conferring with The Builder, I was able to make a few firm decisions this weekend. Here is where we are starting:


The machines pictured are the actual ones I bought. I know, it's a huge change from the red!  But it really matches the feel of the rest of the house, and while it's only a laundry room, we do use it as a walk through from the garage into the house. Also, if the door is open, you can see the laundry room as you walk in the front door. And the door is almost always open.  So here's what we have:

  • Paint - we recently painted our living room Foggy Grey from Behr and I love it.  That's the taupey looking color you see. Interestingly enough, it has a slight green undertone when it's on the wall, which is not at all apparent in the paint swatch here.  And I really like the Tricorn Black as the trim paint. And maybe the door into the garage that always shows dirt so easy!
  • Tile - Fiorella Matte Ceramic tile from Floor & Decor.  This is really the showstopper in this small space. We're only putting it on the main wall where the machines are, and then only half of the wall at that. You'll be able to see the wall if the door is open, so I feel good about this decision.
  • Light Fixture - so technically, this is a want, not a need. I have a perfectly good boob light that I could repaint the base and use.  But this light is only $30 and appears to be nice and bright in our windowless laundry room. 
This is just our starting point. As you can see, I haven't figured out the storage issue yet.  Ideally I'd like a cabinet in the center of the two shelves, but I'm limited a cabinet that's no wider than 22". I'd also like doors on the bottom so I can stash the cat box and put a cat door in. A little hard to explain, but it keeps everything clean and neat while still offering storage options.  I think a floating shelf above each machine may also be beneficial. 

More to come!

2021 Updates

 Ah, 2020.  I had such grand plans for you.  A laundry room update.  A backyard makeover. The powder room redo.  And which of these things did I complete?

Zip. Zilch. Nadda.  Sigh.

But it's a new year. And all of those things still need to be done. 

So we begin fresh!

Two projects we're anxious to get done are the powder room and the backyard.  Like most people, I've spent a LOT of time at home in 2020. I'm fortunate to be able to work from home and my day job keeps me busy. But if you ever want to know what areas are lacking in your home, spend an entire year there. 

You may remember this mood board for our powder room:


I did order the samples of the wallpaper from Spoonflower.  I really thought I was going to lean towards the green. Yikes, huge no!!  I'm really glad I got a sample. The Blue Palm is a no go too.  We ultimately went with a crisp white board and batten, like this


So I really like the chair height board and batten in this inspiration, which is the same style we did in our dining room a couple of years ago. So that's what we did (yep, all done!) And I thought I wanted wallpaper above it.  But here's the thing. Eventually, I'll get tired of the print. So I skipped the wallpaper in favor of this dark blue moody color from Behr called Deep Indigo:
This is one of those colors that's hard to judge by the swatch. It's really pretty next to the pure white paint on the board and batten and I really love how it turned out (however, not such a fan of needing to re-paint the ceiling that got bumped with this dark color though!!)

So with the board and batten done and the paint up, the next major step is the vanity.  I've said it a hundred times at this point, Vanity's are too expensive. Seriously.  I don't get it. So when I fond this vanity top on clearance at Home Depot in September, I jumped on it:

This vanity usually is  $263 at Home Depot. But they had one on clearance for $69. It's 31" wide (I'm limited to 33"!) and is SO much better than the builder's grade clam shell sink we initially had, or the $99 special, particleboard vanity we bought to use while we were remodeling the upstairs bathroom. So we have a vanity build on the books to get this step finished and it needs to be sooner than later!  The downstairs powder room actually sees quite a bit of use since its the only bathroom downstairs.

This brings me to my next issue.  Initially, I clearly had a tropical theme in mind, with the palm leaf wall paper and bamboo framed mirror.  Not only does this not fit the vibe of the decor now, but I also already bought a mirror on clearance that doesn't match ANY of the decor items on my mood board.  So expect an updated mood board soon!!


More Future Planning

More project planning today!

Much like our powder room that I posted about here, my laundry room hasn't had any type of update since I painted the walls the same shade of blue I painted the guest bathroom was when we rented the house. Also much like the powder room, the laundry room is SMALL. It holds exactly the washer, dryer, and a cat box for the length of the room.  There's also a door to the garage.  That's it! Lately, I seem to have laundry room envy for people who have these bright, airy, spacious laundry rooms with a sink, storage, and natural lighting. Ours is a windowless room stuffed between the garage on the one side and stairs on the other. I "suggested" putting in a cute round, porthole style window, since the back wall is the side of the house, but The Builder just laughed and promptly said no. 

Here were the updates I made back then:

I never got my Tiffany blue paint.  I do have the Ikea countertop and container for the liquid laundry detergent soap. There was one for fabric softener as well, but it got broken. I still have my Breakfast At Tiffany's artwork in there, but I'd like to move it up to new office space this summer. Also, I no longer have the white Whirlpool machines. They died within a week of each other!  Now I have this pretty red set from LG:
This room is more challenging than I want it to be. I need to add some storage. Despite having two adult kids and two teenagers, they somehow manage to spill detergent all over the room. We currently have the Ikea counter above my machines as a folding table. We foolishly cut it down to fit just the top of the machines.  The kids pile it high with clean laundry as they pull it from the dryer which then spills all over the floor next to the cat box. I don't think I need to continue. I realize no amount of storage will accommodate these issues. But I would like a better option to store cleaning supplies, the iron, extra detergent (you don't want to know how much laundry detergent and fabric softener we go through in a month!!) and have a little more room to fold the laundry.

So I'm going back to the drawing board!  Stay tuned...

Did You Know We Had a Dining Room Project?

I've been re-doing my dining room for seems like YEARS now. 😒 If you recall, I was last planning a Powder Room update. And I still am. Along with a laundry room update...and a backyard update. I have enough projects planned to last forever.  
But my Powder Room inspiration led me to sidetrack to my dining room.  When my wallpaper samples from Spoonflower arrived, I absolutely fell in love with the floral one from this:

The picture online did not do it justice. Only as soon as I saw it in person, I knew that I didn't want it for the Powder Room. I wanted it for the wall in my dining room that has been the bane of my existence in this house. 

Let's take a look at the different lives that have been my dining room:

This is how it has looked since The Builder re-finished the buffet we got at ReStore. I love this piece and it's not going anywhere, but this wall looked SO plain. We eventually put up a shelf, but it wasn't the right size and never quite worked. I love to decorate my dining room table seasonally, so the room itself wasn't plain, but this wall just was not working for me.

This was not a bad look by any stretch of the imagination. But the hutch was way too small for all my dishes (I love collecting dishes to decorate my dining room table) and my desk became the dumping ground for all things. When I went back to school a couple of years ago, this was not a practical set up at all as I was often studying while my family was eating dinner. Talk about distracting! So when I found the buffet above, we did some re-arranging. 

So when I saw the wallpaper, I absolutely knew that it was perfect for the board and batten that I wanted, but not in the Powder Room. In my dining room!  And this project would have been pushed further out except for the small issue we had. You may recall from previous posts that behind the dining room wall is my master bathroom. In 2016, we completely renovated it, including increasing the shower size. Well, the faucet in that shower stopped working. And The Builder thought he had to cut a hole in the wall to replace the valve. Ahem. He didn't.  Thank you YouTube for the video showing us how to fix the problem AFTER the hole was cut...

So needing to repair the drywall, I promptly suggested we'd have less repair work if we did the board and batten with the wallpaper I loved. The Builder was agreeable to this! The large section of white on the wall is where the hole was. This was completely repaired, primed, and painted over. We had drywall mud dust all over the house for days. This was not the fun part of the project...


Once the wall was repaired, The Builder started framing out the board and batten. I did not want this to be chair rail height because I wanted the board and batten to "frame" my buffet. The Builder was concerned that this was going to be too high, but he reluctantly went with 42" from the baseboard. We also had to keep in mind that the thermostat is on this wall. We actually moved the thermostat over. We always thought it had been installed in an odd, random place. It's now closer to the edge of the wall and ended up being perfect. More on that later.

Once we had it all framed out, we put smooth 1/8 inch MDF in the framing. Our walls are terribly out of plum and this wall has always bugged the The Builder because you could see that it was a wavy wall. In addition, this is another wall that had heavy texture on it at when we moved in. We scraped it down years ago, but the remaining textured would have shown with the high gloss paint. We wanted the board and batten to be smooth so he put this up with some liquid nails and a few small nails. 

A few coats of white paint later and it was starting to come together! We used a sprayer and a compressor to get a super smooth finish. The paint does need to be slightly thinned out for the spay gun, but I had Floterol on hand it's perfect for this. 

I'm not going to lie, this took quite a few coats of paint and lots of light sanding in between coats to get it where we wanted it. In the end, we were very happy with the results. The last panel on the end covers up most of where the hole had been. If we didn't know that the shower valve can be fixed from inside the shower, I never could have done this. But we don't need to get into the wall, so we felt confident doing this. 


Please forgive the poor lighting in here! It was really hard to photograph as there is only one time of the day I get natural light in this spot and of course, it wasn't when I was photographing things! 

This wall visually looks SO tall now and makes the dining room feel bigger.  Even better, the thermostat ends up being right where some of the flowers were on the wallpaper and almost blends right in. I really feel like the board and batten frames the buffet now as well. I added the two buffet lamps for some additional lighting. I did have the "Pray Without Ceasing" sign above the buffet before but now it needs a new home. 

Now to plan out the remaining projects!


Inspiration, Take Two

I was on a self-imposed blogging hiatus due to work (that real life thing that pays the bills!). I did decorate for fall...but didn't take photos. I also decorated for Christmas and even took photo's, but it's now February so that seems a little pointless.  So let's just pick up where I left off. Our downstairs powder room.

I posted this photo of what I thought my inspiration was for updating our powder room downstairs:

And while I still like many aspects of this design...I realized I'm completely over very neutral decor.  This is a powder room that has no natural light.  I don't think the lightness that I like in this inspiration photo would transfer well in my dungeon of a bathroom. This design is too neutral.  So I needed to take some basic concepts from this and update my inspiration.  Then I found this:

Thinks I like about this:

  • the wallpaper!  We had already planned to do board and batten in the bathroom to help hide the fact that the wall is warped. I was going to do brick wallpaper above the board and batten but I'm concerned it's too industrial looking. The wallpaper in this photo is far from industrial
  • the brushed brass accents. I don't know that I will do a light fixture (more on this later) but I love the brushed brass on the mirror and hand towel holder. I recognize that this is a trend that WILL eventually pass and I've avoided it for the most part. But I think some small accents that I could easily swap out if I get tired of them is a practical option. 
Things I'll keep from the original inspiration:
  • The wooden vanity that is fitted to the wall. My powder room is very narrow. As I've mentioned, I bought a cheap vanity from Lowes to use when we remodeled the kid's bathroom upstairs a few years ago and we moved it in here when we were done. Despite the fact that there is no shower in here, that cheap vanity has warped badly. Plus there is NO counter space with that small vanity. My thought was that you wouldn't really need any since it's just a powder room. I have since learned the error of that thought process.
  • The wall mounted faucet. I was going through my design inspiration book I've saved on Houzz this morning and I realized that almost all the photo's I chose have a wall mounted faucet. And I really like it!! I have to admit, I'm sorely tempted to go with brushed brass here too. I found this set on Amazon that is very cost effective:
  • The round mirror.  You may have noticed there's one in both photos. Again, this is another element that I find is common amongst the photo's I saved. 
Things that I want different from both photos:
  • wall sconces. The Builder probably won't be happy with me, but I really don't want a light hanging from the ceiling or above the mirror. I want something like this: 
    No, not the shiplap (sorry Joanna!). Again, while I really like the look of shiplap, in the very near future, it's going to be a dated trend. I want to be able to update decor items, not mess with tearing down an outdated look. 
  • the vessel sink - I'm just not sure I like this.  However, with the wall mounted faucet, I may not have an option. This is a wait and see item
  • baskets everywhere - yes, a small nitpicky thing, but I have them upstairs in the kid's bathroom (i have two adult kids and two teenage kids) and they do nothing but toss junk in them. So I'd like to find a different storage option for extra toilet paper, cleaning supplies, and miscellaneous items. 
So, how does this all translate into what I actually picture in my powder room?  Well, I have two very different ideas of how it could look.

Option 1
As you can see, this really mirrors the design inspiration photo that is my Take Two. I really love the green Palm wallpaper. It's a nice pop of color in a windowless room with artificial lighting. I think the brushed brass accents would look lovely with the green wallpaper and the white board and batten. Why the second wallpaper option?  The Builder is not a fan of green (and this is also his throne room!). He would prefer the blue palm leaves. It's also almost identical to the inspiration photo. We can order samples of both wallpapers to determine which one we ultimately like.  Either go with the rest of the finishes. I have a couple of different scone options, one that has a touch of the brushed brass and one that doesn't. Both would coordinate with the bamboo framed mirror. The faucet comes in several different finishes so I wouldn't have to go with the brushed brass.  But I'm tempted!  We'd do a floating vanity in a finish to coordinate with the mirror. We plan to build that, so more details to come. 

But I could take this design inspiration in a totally different direction.

Option 2
So on this one, same board and batten and floating wood vanity, but totally different wallpaper. Which changes the feel of the room completely.  This look actually compliments our house better. I love galvanized metal and have used it as an accent throughout our dining room and family room.  Since the powder room is right off of the dining room, this would be a really cohesive feel. I've also given options for an arched mirror vs. a round mirror. I really like the little shelf, which is handy for putting your phone or watch on to keep it from getting wet while washing your hands. Or a little vase of fresh flowers... I also have some additional accessories in the bathroom already that would also compliment this look. 

What do you think?  We don't plan to start this small renovation until this summer, and we've given ourselves a three week timeline (we're not stripping wallpaper, removing flooring, or making any changes to the existing layout). The plan is to build the vanity this spring and once we make a design choice, start buying the items. The biggest time zapper on this project will be the board and batten. That will be a solid weekend to get done. Then we'll need to move the electricity and patch the drywall. That should take a second weekend. The rest of the updates should go quickly after that. 

Now to make a final decision on the design!


Inspiration

Is my backyard done?  No

Is my son's bedroom done? No

Am I done decorating for fall?  No

Did I find a new inspiration photo today?  YES


I'm not actually starting a new project. I don't have the time or resources at the moment. One of my favorite bloggers, The Handyman's Daughter, posted the above photo on her blog as inspiration for her ORC (One Room Challenge) and I suddenly knew exactly what direction I want to take with my own powder room!

The powder bathroom that I updated several years ago is just plain blah. I really liked the muted blue color at the time, but now it seems dull and lifeless (same with my laundry room that I painted the same color). The cheap vanity that I installed from Lowes is disintegrating after minimal use. I knew I wanted to replace it with a floating vanity that The Builder could design and build for us. So when I saw this, it just really appeals to me on a lot of levels. I like the texture, I love the round mirror, and I think it would complement the board and batten I plan to put up (our walls are bowed with the house settling over time and The Builder feels the board and batten will help hide it). I don't know that I would do faux brick on the wall with the sink. I'm worried any water splashed on it could easily ruin it. But I COULD see it on the back wall where the toilet is with floating shelves. Houzz won't let me Pin this to my Pinterest Board but they do have a nice embedded link to add it here. So maybe after my office is done next year (ahem, yes, another project, but not until summer!) I can contemplate this. 💓

Painting Over Dark Colors

I spent the weekend working on my middle sons' room. In the last blog post, I showed you a photo of what the room looked like when I updated it several years ago:
This paint color was chosen by my oldest son, who loves the color orange. It went well with the comforters and the overall rustic feel of the room, and it worked well for several years.

My middle son, however, has never had a room all to himself. He has either shared with his older or younger brother. I knew for the year that he will have the room all to himself (he's going into the military also when he graduates next year from high school) I wanted him to have a room that was 100% his and nothing left over from his brother. I also know that I will be taking over this space next year when he leaves, and I wanted something that would transition well, color wise, into my office. 

First of all, I have to say, my son is a sweetheart. He told me I didn't have to paint the room at all, he just wanted a bigger bed and a new comforter. And a desk.  If I was going to repaint then anything but pink. Pretty low requirements! But two boys are hard on things and I really felt that the whole room needed refreshing. So this weekend I spent time painting. 

Can I just say that deep orange is a bear to cover up?

It was still drying in this photo, but that orange wall took 2+ coats to completely cover up. I used the entire gallon of paint for this room. I'm a huge Behr paint fan, in fact it's the only one I use, and I usually only buy the Ultra. In the future, if I need to cover a bold color like this one, I will spend the extra and get the Marquee because I was stressing on the last wall that I wasn't going to have enough paint! The whole wall looked like it had a bad five o'clock shadow after the first coat. I really wanted to get a photo of it, but with the late afternoon sun, it just photographed shadowy. 


And here is the semi-finished room!

This photo has the best representation of the color, at least on my monitor!  I ultimately went with the Ocean City Blue, a Benjamin Moore color that I had made up by Behr. I am really lovving this color. My son was only 'eh' about it. I quickly reminded him he told me 'any color but pink' and he laughed and agreed that's what he stated.  So this color stays!

I moved the entire room around for this re-do since it no longer needed to accommodate two twin sized beds. This dresser is still the perfect size for this room and meets all his needs, but as you can see, it needs to be refinished. There are Star Wars Lego stickers and little doodles done in black sharpie on the side. But this weekend we were just painting and moving furniture into place.  
Previously, the boys had taken the small glass and metal desk from their little brother's room, but it never really worked well in their rustic room. And it was really too small to do homework on. I've been drooling over the Printer's Key Hole Desk at Pottery Barn, but seriously, I am never spending $1000 on a desk. I found this one at a local auction site online. Again, this is going to need some updating. I'm not fond of the orange color and since this is a solid maple desk, this is something I can change. I also want to swap out the hardware. So these are minor projects, but they don't keep the desk from being unusable and so we put it up in his room. I need to figure what to do with this wall too. He doesn't like a lot of clutter and wants things kept clean. 


Right now the bed is centered under the window and the nightstand is oddly just out of reach. We're building him a new full size bed to replace the twin size bed. It may not appear so in this photo, but this looks a little wonky in person. The bed under the window was not really my preferred placement, but the wall where the desk is doesn't have power outlets (if you have been following me for a while, you may remember that this was an office when we moved in and the wall with the desk had a huge half hexagon cut out that opened to the entryway below). He did have his TV on this wall but there were all these power chords running across the entrance to his closet, which is just to the left of the desk. At least his laptop can be put on a charger on another outlet in the room. But he really wanted his TV viewable from his bed and this is the best option. I think I've settled on curtain from Ikea that are a shade or two deeper than the wall color and I think they'll frame out the bed nicely. He has blinds for privacy, but this is the sunny side of the house in the summer and this room BAKES in the afternoon, so the blackout curtains are more of a need than anything else to cut back on the heat. 

I have plans to put up his dartboard, add some artwork I've already purchased, and build some floating shelves still. When you add the bed and the refurbish on the dresser, desk, and nightstand, that's a LOT of projects for this room before it's done. So the goal for the first one is to get the bed built since he outgrew this one a year or two ago. I've already purchased the mattress and we chose a simple bed design, so hopefully, this will be completed in the next two weeks. 

More to come!


Summer Plans

The last few weeks we've been running non-stop.  The Builder changed jobs (a good thing). Our oldest son graduated from high school (almost a miracle, lol) and all our family came out for an extended visit. It was lovely.

But we're ready to get back to projects!

We should finish the backyard. After tilling up the yard, the grass around the firepit mysteriously sprouted and started growing. We have never been able to get it to grow before, but now it's trying to connect to the grass area. So we'll have to fix that. We got rid of the two rabbit hutches, but we still have some debris around the yard. So that needs to get done. I'd like to put in some lights too. But it is HOT for June. Too hot. So aside from picking up after the storm, we're holding off on the yard (but I am incredibly thankful for the sprinklers that we got fixed!)

The pantry is almost done too. We have some tile to lay in front of the new cabinet, we need to find the right countertop, and I have a few more things to sort storage wise, but it is SO pretty.  Photo's on that coming soon.

The Builder has also started on some new end tables for our living room. They're another leftover project from May that we got about halfway done. The goal was to have them completed before our family arrived but we just ran out of time. One of the two is about 80% done so maybe it will get finished up by the end of the week. And that's a very doubtful maybe...

But the project we're starting next is my middle sons' bedroom.  When his brother leaves for boot camp later this month, for the first time in his life, he won't be sharing a room with anyone! He asked for two things when we re-do his room:  A bigger bed and a desk to use when he has homework. At 16, he's grown quite a bit since The Builder built his twin size bed out of reclaimed lumber nine years ago. The desk he has wanted for some time, but there just wasn't enough space in the room. He wasn't going to change his room color or bedding, but I had to point out that a bigger bed necessitated new bedding. And the rusty orange color is his older brother's choice, but it's not actually one that I would pick for my middle son. The last time I updated the bedroom they shared we had this:
This was also probably the last time it was actually this clean as well...But my middle son is actually very tidy (so sharing a brother with his not tidy brother drives him crazy!) and I'm fairly confident that he'll keep it fairly clean once it's done.

We've made small changes over the years, like replacing the carpet with inexpensive vinyl wood planks (that are not holding up well - boys are HARD on things!). We also added a desk between their beds that serves as more of a nightstand than a desk, as it was small to accommodate the space we had available, and on the wall opposite their beds, a TV. I always wanted to do more in this room but we never seemed to get around to it. Plus did I mention it was always messy?!

So here's the thing. Re-doing my sons' room is almost a waste of time. Just like his older brother, he's enlisting in the military and leaving after he graduates next year. He chose a different branch of the military, but I'm super proud of both of them. Once he leaves, I will be taking this room as my office/craft room. They have the most amazing walk in closet, with built in shelving, and I will finally be able to organize my craft supplies. But I just can't leave my son in a room that isn't personalized for him given the fact that he's never had his own room. So my goal was to not only update his room on a budget, but also to pick a room color and some accessories that I could repurpose after he moves out.   Here is what I've come up with so far:


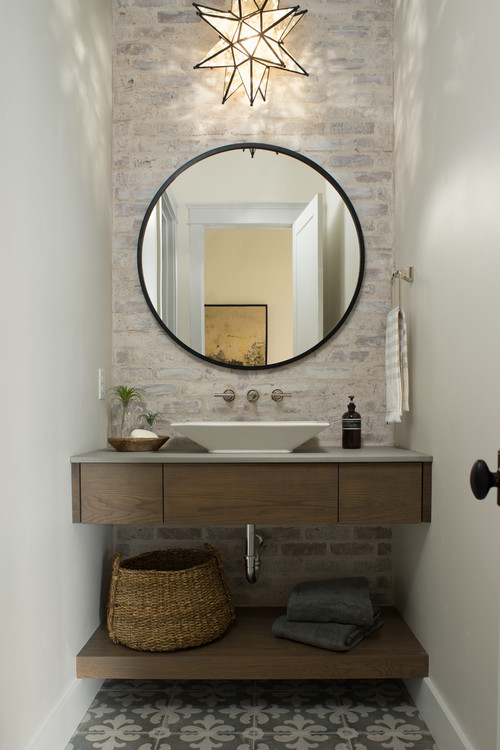
I am SUPER excited to get this rolling. The bricks are actually wallpaper that I found here. I had initially looked on Home Depot's web site, but Ebates quickly let me know that an Ebate vendor had this for less. I can't wait to get this ordered! I'm going to do the wall that the bed is on as the feature wall with the wallpaper. I think it will be a nice contrast to the new bed. 

The bed is The Modern Farmhouse Bed from Ana White. This should be a fun and simple build! It has a nice masculine feel and will easily transition to my younger son once this room is ready to be converted into an office. And eventually, when the youngest moves out, it will serve as our guest bedroom. So a win all the way around.
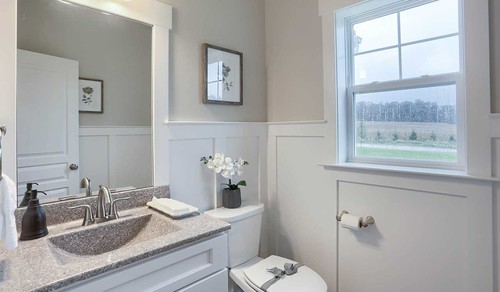
The bedding is from Ikea and was actually the color inspiration. If you look closely at the plaid, it has a deep almost teal color in it (I think the paint swatch does a great job bringing out the color in the plaid!). I haven't decided if I'm going to go with the Bella Blue from Benjamin Moore yet. I had a sample made up at Home Depot (I'm strictly a Behr paint girl!) and I was really surprised at how dark it dries. I'm going to swatch it on the wall once I pick up the bedding next week, but as you can see, I also pulled the color card to see what other colors were in that shade range. I suspect I may end up with Hemlock or Ocean City Blue, but that may require more paint samples (ahem, if you've ever painted an ENTIRE room the wrong color at 4am while seven months pregnant because you can't wait any longer for your husband to get it done you may understand the value of buying paint swatches)

That brings us to the desk.  I'm not actually buying the desk from Pottery Barn. The Printer's Keyhole desk would set me back a $1000 plus sales tax. My whole room budget, including the mattress, is around $500. Of course Anna White has an incredible copycat plan for this desk, but it would still cost a couple of hundred dollars to make. Definitely a bargain in comparison, but also not in the budget. However, I frequently search a local website called Texasauctions.hibid.com and came across this beauty:
I didn't recognize the furniture maker, Conant Ball, when I won this auction for $80. This is a solid maple desk and after a quick Google search, I discovered they were a furniture maker known for their mid-century modern pieces. And it is beautiful! We are going to update the finish, which is a little too orange for my tastes, as well as update the hardware, but it has very similar lines to the Pottery Barn desk and I couldn't make this for what I won it for. Ideally, I'd love to match the finish on the Pottery Barn desk and stain the bed to match, but we shall see.

The desk chair is from Overstock.com  This may be a later item as it's about $100 and I still have to purchase a mattress for the bed.

The other piece that will get a makeover is his dresser.  I bought the dresser from a local furniture vendor when my boys were five and seven. It's a solid pine dresser that's been sharpied and covered in stickers over the years. However, since it's solid wood, it's nothing that a little GooGone and sandpaper can't take care of before I re-stain it. I plan to stain it to match the desk and bed.

The only things I haven't figured out are the final stain color, hardware for the desk and dresser, and curtains. This room gets full afternoon sun in the summer and I think a roman shade lined in black out material is the most practical, but I haven't found anything that goes with this. Possibly I'll buy a twin duvet for the fabric and make something coordinating. I've only ever sewn curtains when I was pregnant, lol, so I'm not actually overly excited about that option but it's probably the most practical.

Once he has moved out next year, the room can be updated with coral, peach, and cream accessories to soften the wall color. I plan to keep the desk and possibly the dresser, but the bed will move into the youngest sons' room (where I suspect I'll also be doing a room update for him!).

I'm probably at least two weeks out from starting this project as we have plans this weekend that will prevent anything from starting. Also, Behr paint usually goes on sale 4th of July weekend so I may not start painting until the following Saturday. On the other hand, he is super excited to get his own room and I'd like to put this together for him as quickly as possible!

Brick Pathway

The goal in May was to get the brick path in. Let's just say the Texas heat won this round!

We did make progress.

It appears that we have taken all the back breaking projects in the backyard this month. And by we, I mean The Builder.

And we did eventually make it down to the end of the house with a pile of miscellaneous reclaimed bricks, which is good. But we actually completed the project in June. And we are OK with that!

But I'm still not ready for the final reveal. We were advised to let the grass grow really long before we took a lawnmower to it, and at the moment, it looks very shaggy and overgrown. We also just had a huge rainstorm and the trees rained down flower blossoms. It looks like the middle of spring!

Even though the graduation is over, we're not done with projects. More to come!

And then there was grass...

About a month ago, the backyard was looking like this:

The chairs were an improvement. And the trees and weeds are green, so it doesn't look like a dirt farm in the backyard. But the reality is the area behind the fire pit was uneven, had holes where our dogs had dug, and was not as kid friendly as we would have liked. But we had a new fence and it was an improvement from where we were this time last year.

The Builder and I went back and forth on if we were going to re-seed the backyard or lay down sod. Cost wise, re-seeding was more cost effective.  There is already a sprinkler system in the backyard and aside from one or two sprinklers that needed to be capped or replaced, it's actually well layed out. Time wise, we knew we were cutting it close for the arrival day of our family at the end of the month. Would be the grass be grown in enough for our nieces and nephews to be able to play outside? And what about the dogs?  Would they continue to dig holes in the newly seeded dirt?  What if it rained really hard (more of an issue than dogs actually)?  And so last weekend we decided to go ahead and do the sod.

This is a whole palette of grass (can you tell that his truck is completely weighed down?!).  It doesn't look like much in this photo, but his truck was filled to capacity!  We also bought a total of 12 bags of manure. Super fun.

Can I tell you how much work it is to unload a truck and then cart it all into the backyard by wheelbarrow? Yeah, it's seriously hard work! Shout out to my three teenage boys because they were a huge help in this project.


If you follow me on Facebook, I posted a video of The Builder using the tiller we rented from Home Depot to till the ground and level it out. And here's the point that sold us on the sod. Whether we did seed or sod, the ground had to be tilled and leveled out. And that machine is  "a beast" in the words of The Builder. To do all that work and then have the dogs get out and tear up the fresh ground or rain come and wash it all away seemed like a huge waste of time and money.

Even with the tiller, it was a lot of work. Apparently, there are a lot of roots in our backyard. Roots that even the tiller couldn't get through. So my boys had to tear them out or use the sawzall to cut them out. Not a fun job.

And after tilling up the ground we had to rake it smooth and then put down the manure and then rake it again. Seriously, sod is hard work.


Yep, they were all out and taking turns.

And at the end of the day on Sunday, we had this!  We took the extra step of adding turf builder to it to help it root down. Now a week later, the grass is greening up nicely and we can see fresh shoots.

See that area to the left of the photo?  That is where the brick path is going. Becuase that is where all the water in the yard drains and is a quagmire of mud any time we need to go out and feed the dogs are let them out of the dog run. So that's the next project on the backyard list (and the last at this point!).

More to come

Pantry Updates & Storage Organization


Look at this pantry space!! This space is SO open now. I was super excited to wake up to this on Saturday morning. The Builder spent his evenings this past week taping, mudding, sanding, and texturing the walls of our new pantry and the wall behind it where the closet door once was. Our kitchen feels so much bigger now that this is opened up. I'm sure we'll lose some of that open feel when we build in the lower cabinet, but this really lets you see the space that we're going to have to work with.

Speaking of space, we're going to have open shelving above the cabinet. I have to say, I've never really been a fan of open shelving. I don't like things to look cluttered and I can't imagine my boys family stacking things neatly. So I've been looking at ways to help the pantry stay better organized and I came across this from Amazon:


I'm not sure if one is enough or I'll need to get two, but I really like the way all the cans are easy to pull out. Our previous pantry, we stacked the cans on top of one another because there wasn't enough space, but many times, the cans fall over. Apparently, I was the only one capable of stacking them back neatly and I'd start finding cans on shelves where they didn't belong or knocked down on the floor. 

The other thing I've started stocking up on at Target are these baskets:


And then also at Amazon, I'm going to pick up these baskets for our onions and potatoes:
These will probably be on the lowest shelf so they'll be easy to grab. We used to keep the bags of onions and potatoes on the floor in the pantry. I can't tell you how many times we'd 'loose' them under packages of chips for school or behind the cookie sheets that were also stored there, then we'd smell find an unpleasant mess. I hate wasting food like that. 

I also like the look of these:
I'm not thrilled about the color, but I like the functionality of these. Again, I want my open shelving to be VERY organized. Things that fall off the shelf easily will frustrate me. I like the idea of these holding all my bottles of vinegar (yes, I probably have close to a half a dozen different kinds of vinegar that I cook with...maybe more). And maybe a second one to hold all my Asian seasonings. 

Target has some baskets I've been picking up for a while now:
These come in a variety of sizes.  This small one I use to hold my seasoning packets. It's been great for keeping them in one easy to find spot on the shelf. I just bought a few medium sized baskets this weekend to hold things like boxes of things like cereal, pancake mix, cornstarch, and those odds and ends that no one can ever seem to find in the pantry. 

I also may pick up one more of these from Walmart:
These are fabulous for dropping a bag of sugar or flour in to store. The spout makes it easy to use while the plastic container keeps out bugs. I have several types of flour (self-rising, bread flour, cake flour, and all-purpose) so these really come in handy. They also do a fairly good job of keeping out moisture in our humid summers as well. 

And we have paint! We still need to touch up with another coat (this is still wet) but I am so excited! We headed out to Home Depot Saturday morning to get the materials for the cabinet and The Builder has been busy. Stay tuned!