Inspiration

Is my backyard done?  No

Is my son's bedroom done? No

Am I done decorating for fall?  No

Did I find a new inspiration photo today?  YES


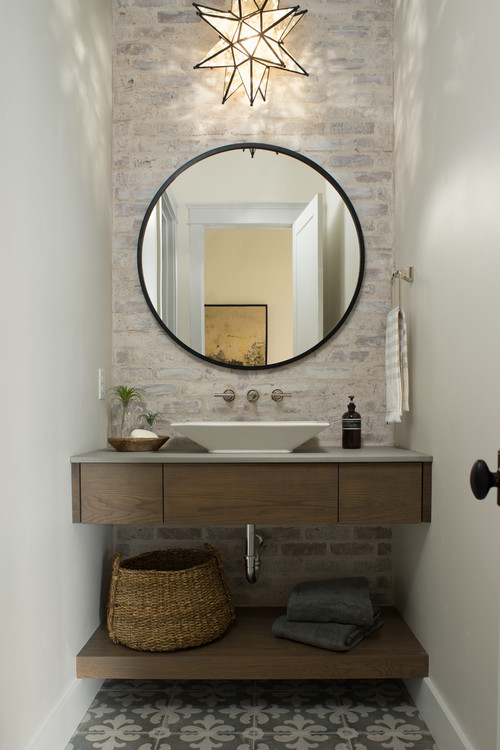
I'm not actually starting a new project. I don't have the time or resources at the moment. One of my favorite bloggers, The Handyman's Daughter, posted the above photo on her blog as inspiration for her ORC (One Room Challenge) and I suddenly knew exactly what direction I want to take with my own powder room!

The powder bathroom that I updated several years ago is just plain blah. I really liked the muted blue color at the time, but now it seems dull and lifeless (same with my laundry room that I painted the same color). The cheap vanity that I installed from Lowes is disintegrating after minimal use. I knew I wanted to replace it with a floating vanity that The Builder could design and build for us. So when I saw this, it just really appeals to me on a lot of levels. I like the texture, I love the round mirror, and I think it would complement the board and batten I plan to put up (our walls are bowed with the house settling over time and The Builder feels the board and batten will help hide it). I don't know that I would do faux brick on the wall with the sink. I'm worried any water splashed on it could easily ruin it. But I COULD see it on the back wall where the toilet is with floating shelves. Houzz won't let me Pin this to my Pinterest Board but they do have a nice embedded link to add it here. So maybe after my office is done next year (ahem, yes, another project, but not until summer!) I can contemplate this. 💓

Painting Over Dark Colors

I spent the weekend working on my middle sons' room. In the last blog post, I showed you a photo of what the room looked like when I updated it several years ago:
This paint color was chosen by my oldest son, who loves the color orange. It went well with the comforters and the overall rustic feel of the room, and it worked well for several years.

My middle son, however, has never had a room all to himself. He has either shared with his older or younger brother. I knew for the year that he will have the room all to himself (he's going into the military also when he graduates next year from high school) I wanted him to have a room that was 100% his and nothing left over from his brother. I also know that I will be taking over this space next year when he leaves, and I wanted something that would transition well, color wise, into my office. 

First of all, I have to say, my son is a sweetheart. He told me I didn't have to paint the room at all, he just wanted a bigger bed and a new comforter. And a desk.  If I was going to repaint then anything but pink. Pretty low requirements! But two boys are hard on things and I really felt that the whole room needed refreshing. So this weekend I spent time painting. 

Can I just say that deep orange is a bear to cover up?

It was still drying in this photo, but that orange wall took 2+ coats to completely cover up. I used the entire gallon of paint for this room. I'm a huge Behr paint fan, in fact it's the only one I use, and I usually only buy the Ultra. In the future, if I need to cover a bold color like this one, I will spend the extra and get the Marquee because I was stressing on the last wall that I wasn't going to have enough paint! The whole wall looked like it had a bad five o'clock shadow after the first coat. I really wanted to get a photo of it, but with the late afternoon sun, it just photographed shadowy. 


And here is the semi-finished room!

This photo has the best representation of the color, at least on my monitor!  I ultimately went with the Ocean City Blue, a Benjamin Moore color that I had made up by Behr. I am really lovving this color. My son was only 'eh' about it. I quickly reminded him he told me 'any color but pink' and he laughed and agreed that's what he stated.  So this color stays!

I moved the entire room around for this re-do since it no longer needed to accommodate two twin sized beds. This dresser is still the perfect size for this room and meets all his needs, but as you can see, it needs to be refinished. There are Star Wars Lego stickers and little doodles done in black sharpie on the side. But this weekend we were just painting and moving furniture into place.  
Previously, the boys had taken the small glass and metal desk from their little brother's room, but it never really worked well in their rustic room. And it was really too small to do homework on. I've been drooling over the Printer's Key Hole Desk at Pottery Barn, but seriously, I am never spending $1000 on a desk. I found this one at a local auction site online. Again, this is going to need some updating. I'm not fond of the orange color and since this is a solid maple desk, this is something I can change. I also want to swap out the hardware. So these are minor projects, but they don't keep the desk from being unusable and so we put it up in his room. I need to figure what to do with this wall too. He doesn't like a lot of clutter and wants things kept clean. 


Right now the bed is centered under the window and the nightstand is oddly just out of reach. We're building him a new full size bed to replace the twin size bed. It may not appear so in this photo, but this looks a little wonky in person. The bed under the window was not really my preferred placement, but the wall where the desk is doesn't have power outlets (if you have been following me for a while, you may remember that this was an office when we moved in and the wall with the desk had a huge half hexagon cut out that opened to the entryway below). He did have his TV on this wall but there were all these power chords running across the entrance to his closet, which is just to the left of the desk. At least his laptop can be put on a charger on another outlet in the room. But he really wanted his TV viewable from his bed and this is the best option. I think I've settled on curtain from Ikea that are a shade or two deeper than the wall color and I think they'll frame out the bed nicely. He has blinds for privacy, but this is the sunny side of the house in the summer and this room BAKES in the afternoon, so the blackout curtains are more of a need than anything else to cut back on the heat. 

I have plans to put up his dartboard, add some artwork I've already purchased, and build some floating shelves still. When you add the bed and the refurbish on the dresser, desk, and nightstand, that's a LOT of projects for this room before it's done. So the goal for the first one is to get the bed built since he outgrew this one a year or two ago. I've already purchased the mattress and we chose a simple bed design, so hopefully, this will be completed in the next two weeks. 

More to come!


Summer Plans

The last few weeks we've been running non-stop.  The Builder changed jobs (a good thing). Our oldest son graduated from high school (almost a miracle, lol) and all our family came out for an extended visit. It was lovely.

But we're ready to get back to projects!

We should finish the backyard. After tilling up the yard, the grass around the firepit mysteriously sprouted and started growing. We have never been able to get it to grow before, but now it's trying to connect to the grass area. So we'll have to fix that. We got rid of the two rabbit hutches, but we still have some debris around the yard. So that needs to get done. I'd like to put in some lights too. But it is HOT for June. Too hot. So aside from picking up after the storm, we're holding off on the yard (but I am incredibly thankful for the sprinklers that we got fixed!)

The pantry is almost done too. We have some tile to lay in front of the new cabinet, we need to find the right countertop, and I have a few more things to sort storage wise, but it is SO pretty.  Photo's on that coming soon.

The Builder has also started on some new end tables for our living room. They're another leftover project from May that we got about halfway done. The goal was to have them completed before our family arrived but we just ran out of time. One of the two is about 80% done so maybe it will get finished up by the end of the week. And that's a very doubtful maybe...

But the project we're starting next is my middle sons' bedroom.  When his brother leaves for boot camp later this month, for the first time in his life, he won't be sharing a room with anyone! He asked for two things when we re-do his room:  A bigger bed and a desk to use when he has homework. At 16, he's grown quite a bit since The Builder built his twin size bed out of reclaimed lumber nine years ago. The desk he has wanted for some time, but there just wasn't enough space in the room. He wasn't going to change his room color or bedding, but I had to point out that a bigger bed necessitated new bedding. And the rusty orange color is his older brother's choice, but it's not actually one that I would pick for my middle son. The last time I updated the bedroom they shared we had this:
This was also probably the last time it was actually this clean as well...But my middle son is actually very tidy (so sharing a brother with his not tidy brother drives him crazy!) and I'm fairly confident that he'll keep it fairly clean once it's done.

We've made small changes over the years, like replacing the carpet with inexpensive vinyl wood planks (that are not holding up well - boys are HARD on things!). We also added a desk between their beds that serves as more of a nightstand than a desk, as it was small to accommodate the space we had available, and on the wall opposite their beds, a TV. I always wanted to do more in this room but we never seemed to get around to it. Plus did I mention it was always messy?!

So here's the thing. Re-doing my sons' room is almost a waste of time. Just like his older brother, he's enlisting in the military and leaving after he graduates next year. He chose a different branch of the military, but I'm super proud of both of them. Once he leaves, I will be taking this room as my office/craft room. They have the most amazing walk in closet, with built in shelving, and I will finally be able to organize my craft supplies. But I just can't leave my son in a room that isn't personalized for him given the fact that he's never had his own room. So my goal was to not only update his room on a budget, but also to pick a room color and some accessories that I could repurpose after he moves out.   Here is what I've come up with so far:


I am SUPER excited to get this rolling. The bricks are actually wallpaper that I found here. I had initially looked on Home Depot's web site, but Ebates quickly let me know that an Ebate vendor had this for less. I can't wait to get this ordered! I'm going to do the wall that the bed is on as the feature wall with the wallpaper. I think it will be a nice contrast to the new bed. 

The bed is The Modern Farmhouse Bed from Ana White. This should be a fun and simple build! It has a nice masculine feel and will easily transition to my younger son once this room is ready to be converted into an office. And eventually, when the youngest moves out, it will serve as our guest bedroom. So a win all the way around.

The bedding is from Ikea and was actually the color inspiration. If you look closely at the plaid, it has a deep almost teal color in it (I think the paint swatch does a great job bringing out the color in the plaid!). I haven't decided if I'm going to go with the Bella Blue from Benjamin Moore yet. I had a sample made up at Home Depot (I'm strictly a Behr paint girl!) and I was really surprised at how dark it dries. I'm going to swatch it on the wall once I pick up the bedding next week, but as you can see, I also pulled the color card to see what other colors were in that shade range. I suspect I may end up with Hemlock or Ocean City Blue, but that may require more paint samples (ahem, if you've ever painted an ENTIRE room the wrong color at 4am while seven months pregnant because you can't wait any longer for your husband to get it done you may understand the value of buying paint swatches)

That brings us to the desk.  I'm not actually buying the desk from Pottery Barn. The Printer's Keyhole desk would set me back a $1000 plus sales tax. My whole room budget, including the mattress, is around $500. Of course Anna White has an incredible copycat plan for this desk, but it would still cost a couple of hundred dollars to make. Definitely a bargain in comparison, but also not in the budget. However, I frequently search a local website called Texasauctions.hibid.com and came across this beauty:
I didn't recognize the furniture maker, Conant Ball, when I won this auction for $80. This is a solid maple desk and after a quick Google search, I discovered they were a furniture maker known for their mid-century modern pieces. And it is beautiful! We are going to update the finish, which is a little too orange for my tastes, as well as update the hardware, but it has very similar lines to the Pottery Barn desk and I couldn't make this for what I won it for. Ideally, I'd love to match the finish on the Pottery Barn desk and stain the bed to match, but we shall see.

The desk chair is from Overstock.com  This may be a later item as it's about $100 and I still have to purchase a mattress for the bed.

The other piece that will get a makeover is his dresser.  I bought the dresser from a local furniture vendor when my boys were five and seven. It's a solid pine dresser that's been sharpied and covered in stickers over the years. However, since it's solid wood, it's nothing that a little GooGone and sandpaper can't take care of before I re-stain it. I plan to stain it to match the desk and bed.

The only things I haven't figured out are the final stain color, hardware for the desk and dresser, and curtains. This room gets full afternoon sun in the summer and I think a roman shade lined in black out material is the most practical, but I haven't found anything that goes with this. Possibly I'll buy a twin duvet for the fabric and make something coordinating. I've only ever sewn curtains when I was pregnant, lol, so I'm not actually overly excited about that option but it's probably the most practical.

Once he has moved out next year, the room can be updated with coral, peach, and cream accessories to soften the wall color. I plan to keep the desk and possibly the dresser, but the bed will move into the youngest sons' room (where I suspect I'll also be doing a room update for him!).

I'm probably at least two weeks out from starting this project as we have plans this weekend that will prevent anything from starting. Also, Behr paint usually goes on sale 4th of July weekend so I may not start painting until the following Saturday. On the other hand, he is super excited to get his own room and I'd like to put this together for him as quickly as possible!

Brick Pathway

The goal in May was to get the brick path in. Let's just say the Texas heat won this round!

We did make progress.

It appears that we have taken all the back breaking projects in the backyard this month. And by we, I mean The Builder.

And we did eventually make it down to the end of the house with a pile of miscellaneous reclaimed bricks, which is good. But we actually completed the project in June. And we are OK with that!

But I'm still not ready for the final reveal. We were advised to let the grass grow really long before we took a lawnmower to it, and at the moment, it looks very shaggy and overgrown. We also just had a huge rainstorm and the trees rained down flower blossoms. It looks like the middle of spring!

Even though the graduation is over, we're not done with projects. More to come!

And then there was grass...

About a month ago, the backyard was looking like this:

The chairs were an improvement. And the trees and weeds are green, so it doesn't look like a dirt farm in the backyard. But the reality is the area behind the fire pit was uneven, had holes where our dogs had dug, and was not as kid friendly as we would have liked. But we had a new fence and it was an improvement from where we were this time last year.

The Builder and I went back and forth on if we were going to re-seed the backyard or lay down sod. Cost wise, re-seeding was more cost effective.  There is already a sprinkler system in the backyard and aside from one or two sprinklers that needed to be capped or replaced, it's actually well layed out. Time wise, we knew we were cutting it close for the arrival day of our family at the end of the month. Would be the grass be grown in enough for our nieces and nephews to be able to play outside? And what about the dogs?  Would they continue to dig holes in the newly seeded dirt?  What if it rained really hard (more of an issue than dogs actually)?  And so last weekend we decided to go ahead and do the sod.

This is a whole palette of grass (can you tell that his truck is completely weighed down?!).  It doesn't look like much in this photo, but his truck was filled to capacity!  We also bought a total of 12 bags of manure. Super fun.

Can I tell you how much work it is to unload a truck and then cart it all into the backyard by wheelbarrow? Yeah, it's seriously hard work! Shout out to my three teenage boys because they were a huge help in this project.


If you follow me on Facebook, I posted a video of The Builder using the tiller we rented from Home Depot to till the ground and level it out. And here's the point that sold us on the sod. Whether we did seed or sod, the ground had to be tilled and leveled out. And that machine is  "a beast" in the words of The Builder. To do all that work and then have the dogs get out and tear up the fresh ground or rain come and wash it all away seemed like a huge waste of time and money.

Even with the tiller, it was a lot of work. Apparently, there are a lot of roots in our backyard. Roots that even the tiller couldn't get through. So my boys had to tear them out or use the sawzall to cut them out. Not a fun job.

And after tilling up the ground we had to rake it smooth and then put down the manure and then rake it again. Seriously, sod is hard work.


Yep, they were all out and taking turns.

And at the end of the day on Sunday, we had this!  We took the extra step of adding turf builder to it to help it root down. Now a week later, the grass is greening up nicely and we can see fresh shoots.

See that area to the left of the photo?  That is where the brick path is going. Becuase that is where all the water in the yard drains and is a quagmire of mud any time we need to go out and feed the dogs are let them out of the dog run. So that's the next project on the backyard list (and the last at this point!).

More to come

Pantry Updates & Storage Organization


Look at this pantry space!! This space is SO open now. I was super excited to wake up to this on Saturday morning. The Builder spent his evenings this past week taping, mudding, sanding, and texturing the walls of our new pantry and the wall behind it where the closet door once was. Our kitchen feels so much bigger now that this is opened up. I'm sure we'll lose some of that open feel when we build in the lower cabinet, but this really lets you see the space that we're going to have to work with.

Speaking of space, we're going to have open shelving above the cabinet. I have to say, I've never really been a fan of open shelving. I don't like things to look cluttered and I can't imagine my boys family stacking things neatly. So I've been looking at ways to help the pantry stay better organized and I came across this from Amazon:


I'm not sure if one is enough or I'll need to get two, but I really like the way all the cans are easy to pull out. Our previous pantry, we stacked the cans on top of one another because there wasn't enough space, but many times, the cans fall over. Apparently, I was the only one capable of stacking them back neatly and I'd start finding cans on shelves where they didn't belong or knocked down on the floor. 

The other thing I've started stocking up on at Target are these baskets:


And then also at Amazon, I'm going to pick up these baskets for our onions and potatoes:
These will probably be on the lowest shelf so they'll be easy to grab. We used to keep the bags of onions and potatoes on the floor in the pantry. I can't tell you how many times we'd 'loose' them under packages of chips for school or behind the cookie sheets that were also stored there, then we'd smell find an unpleasant mess. I hate wasting food like that. 

I also like the look of these:
I'm not thrilled about the color, but I like the functionality of these. Again, I want my open shelving to be VERY organized. Things that fall off the shelf easily will frustrate me. I like the idea of these holding all my bottles of vinegar (yes, I probably have close to a half a dozen different kinds of vinegar that I cook with...maybe more). And maybe a second one to hold all my Asian seasonings. 

Target has some baskets I've been picking up for a while now:
These come in a variety of sizes.  This small one I use to hold my seasoning packets. It's been great for keeping them in one easy to find spot on the shelf. I just bought a few medium sized baskets this weekend to hold things like boxes of things like cereal, pancake mix, cornstarch, and those odds and ends that no one can ever seem to find in the pantry. 

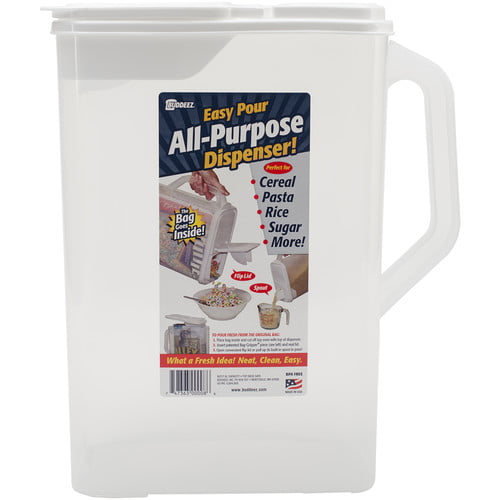
I also may pick up one more of these from Walmart:
These are fabulous for dropping a bag of sugar or flour in to store. The spout makes it easy to use while the plastic container keeps out bugs. I have several types of flour (self-rising, bread flour, cake flour, and all-purpose) so these really come in handy. They also do a fairly good job of keeping out moisture in our humid summers as well. 

And we have paint! We still need to touch up with another coat (this is still wet) but I am so excited! We headed out to Home Depot Saturday morning to get the materials for the cabinet and The Builder has been busy. Stay tuned!

Pantry Demolition Day

This spring has been very cold and wet. The cold is unusual. We typically break out shorts at the end of February and stay in them until Thanksgiving. But not this year! Of course, this is the spring we decided to get some outside stuff done before the summer heat kicks in. We managed to get the new fence installed, the ceiling up on our sunroom, and some patio chairs around our fire pit, but the rain has prevented much else from getting done. We didn't want to waste time though, so we started a new project.  

This was our coat closet. It was filled with jackets that are too small (literally, my 18 yr old son's jacket from when he was 10 was still in the closet!!), some odds and ends that we had stashed when we moved in that we didn't know what to do with, and the dog and cat food. So except for the pet food, it was completely wasted space. On the other side of the wall to the right is the pantry. I have yet to understand why home builders who build family-sized homes (we have a 4 bedroom, 2000 sq ft home) make kitchens that impractical! Our overall size is actually good in this kitchen, but the pantry was stupid small. We took the door off two years ago because things would spill out at us because it was over packed. In my defense, of my four kids, three are teenage boys.  They eat A LOT!!! And I love to cook. I like having a well stocked pantry. So I asked The Builder how he felt about closing off the wall to the coat closet and opening up the wall into the pantry to expand it out. He was completely on board!

You can see here that the drywall is going in where the closet door used to be. The two spaces are now open side by side, although the studs still need to come out. The left is the original pantry. I think if it hadn't been framed for a door, it might have felt more usable, even though there really wasn't any more space. But trying to get into the pantry through the narrow door was never good. The coat closet added about 36 inches to the overall width. The total width when we're done will be 84". The top will have open shelving but the bottom we're building a custom cabinet. It will have a butcher block top and three divided sections. 

One of them will be used to store the pet food that was in the coat closet.  We will use these recycling bins from Ikea:
One of them will be used to store the pet food that was in the coat closet.  We will use these recycling bins from Ikea. We bought one so we could properly size the shelves to put them on. This is the shorter one, but we actually bought the taller ones that will hold more food.  The 'door' that opens on the front of the recycling bin is perfect to be able to scoop out pet food. 

We'll also use some of the cabinet space to store my ever-growing collection of small kitchen appliances. Because you see, apparently I have a problem. I recently got a panini press to add to my collection.  Earlier this year I bought an Instantpot (LOVE this) and an air fryer (love this even MORE). We have a tabletop movie popcorn maker that my son got for Christmas, in addition to normal appliances, like a toaster. I also have an assortment of mixing bowls and other kitchen gadgets that aren't currently stored very well. My kitchen cabinets are awkward with a weird half shelf in them that doesn't let me store larger items. So this extra tall pantry cabinet is going to be a great addition to our kitchen.

You can see here we're filling in the wall with drywall. My goal is to put hooks on the wall so that we can still hang things like backpacks and purses here. I'd like to put in a storage bench as well. The Builder comes home with muddy boots from job sites and it might be nice to have a place to store them out of site (he currently drops them at the door). If not a bench, then perhaps a small table where can put a mail sorter and a key ring hook. My reality is that after next year, I'll only have one remaining child at home. So I want to keep this space practical


On the bright side of this demo, this is the first project that we've had at this house where when we opened a wall, there was NO water damage. I mean, there shouldn't be in a pantry and a coat closet. But with this house, we never actually know. We suspect most of the water damage is from Hurricane Ike. We know they put on a new roof after that. But this time, no water damage!
This demo did end up being more complicated than we expected. At one point in time, there was a security system in this house. The panel was still hanging in the coat closet but has been disconnected for some time. There was a power supply to the box that we thought we'd move to the outside wall since there was already a junction box in the pantry. Well surprise, that is a dedicated power line that is COMPLETELY SEPARATE from the rest of the power in the entire house. After we finally got it turned off at the box, The Builder went up to the attic to move the power line. Only to discover we'd have to remove the carpet in the closet of the boys' room to access the junction box in the ceiling to get to it! That is not a project we want to take on at this point so we're going to cap it at the wall and leave that as a project for another year day. 

This has all been over the last couple of weeks, but we've made a lot of progress this past week.  More to come!


Backyard Progress

For the last month, we've been working on the backyard. We've made some good progress, but not as much as I would have liked!  We completed a trashcan corral (I will spare you the photo's, it's a fenced off area inside our fenced in backyard and it contains...trash cans...) which I am thrilled about because we no longer have to store it in the garage. 

We also completed the last of the new fence.  This was the longest section, which spans the entire length of our house. Huge Kudos to my sixteen-year-old because worked with The Builder over three weekends digging new fence holes, pouring concrete, laying out the fence line, and getting it put in. And he did all the hard manual work, like digging fence holes and mixing and pouring the concrete. Since The Builder is only six months out from his last shoulder surgery, these are not things I we felt he should be doing.                                                                                                                                                     
Here we are on a non-rainy day (we've had a lot of rain this spring, not what we really want after Harvey...).  The fence really looks nice. We've added some Adirondack chairs that we purchased at Lowes. I really like the bright pop of blue back here.  We had a bonfire a night or two before this photo was taken and we quickly realized seating was a priority. We're running out of time for building the chairs on my project list, and that's OK. My family really likes these so this is a win-win!

Of course, the rest of the yard still needs work:


The view from the other side of the yard.  We were going to do a chevron brick walkway, but it will take more bricks that what we have and would more time consuming than we can do right now. So when the rain eventually stops, we're going to pull them out, till the area from behind the chairs back to the fend, and put in grass and a simple brick pathway. 
The other project we've been working on is using the weathered boards from the old fence to put a ceiling in the sunroom.
We're almost out of salvageable boards from the weathered sections of the fence, so the last little bit that's left in the upper left corner (not in the photograph) is going to be done with replacement board we used to patch the fence. Not the end of the world, but I'm hoping a vinegar bath will help them gray up like the rest of the boards.

So we still need to put about a dozen or so boards on the ceiling, refresh the paint in the sunroom, till up the backyard for the grass, and finish the brick pathway back to the dog run (this area is a swampy mess when it rains and a brick pathway would be a huge improvement!). Oh. And our other project. The pantry that we gutted when it started raining a few weekends ago. Stay tuned for that post!


Back to the Outdoors

Two months is a LONG time not to post. 2018 has not started out as planned.  My furnace was condemned (literally!) and had to be replaced New Year's Eve as we were expecting a hard freeze and temperatures in the 20's - which literally never happens in Houston.  Ever!  Except for the year my furnace dies, of course.

Then I needed emergency dental work that didn't work that has led to more dental work.  I could have bought a new car for what I've paid in dental and orthodontia bills over the past three years...

And February is almost over.  Sigh. My living room was SO cute for Christmas. And I was happy with my fireplace for Valentine's Day (I am much much smaller scale for other holiday decorating). But I'm not quite ready to put up what I have for St. Patrick's Day or Easter.

What I am ready for is to look into my backyard and not see a mud pit.

Our backyard has been pitiful from the begining.
This is the only picture I took of it when we were house shopping because there was literally nothing there.  A few trees that completely shaded the backyard and left nothing but a pile of dirt. Four years ago, a big storm came through and knocked down the largest tree (barely missing the house!) which was great for letting light back into the yard...and not so great for the weeds that started growing.

I wish I could tell you we've done something in the last four years with that backyard.  But aside from picking up the dog poop...we have not.

Last year we finally decided to make this sun room a livable space for us. The Builder built a brand new table for the space and we re-screen and tried to dog proof it (ahem, we're re-screening again for this summer, but just two this time instead of every frame!).

Late Summer


And this...is what I never show anyone.  This is my sad, sad backyard.  This is mid summer, so there's actually some weeds greenery and the tree is full. But this turns into muddy mess come spring and any summer rain storm. This winter it was a baren waistland. We didn't even want to use the fire pit (thus the logs you see from a tree we removed).

Which is now the goal! My oldest son is graduating in June and has already enlisted in the Navy (proud future Navy mom here!!) My brother and his family will be out and I'd like a nice backyard where the kids can play and we can relax in the evening. My sun room is so relaxing now, but the view out the windows is just terrible.

The whole back fence has to be replaced. Our neighbor to the left replaced her side last spring and we went in with our neighbor on the right to replace that side. But the two behind us are renters and so I don't really have any hope that they'd be interested in sharing the cost of rebuilding that fence. Once the fence is done, we're going to gravel around the fire pit, put in a brick path with reclaimed bricks back to the dog run, and put down sod in about half the yard. I don't have small kids anymore so there's no need to grass in the entire yard. Believe it or not there are actually already sprinklers here, we just need to make a few repairs to some broken lines and replace the sprinkler heads to get it running.

So here is The Plan:

  1. Replace the entire back fence - I wish I could say this is the most time consuming part...but it may not be. The goal is tear the fence down in sections, replace the rotted fence posts with new posts (we'll be digging new holes, which is labor intensive, but not chipping out concrete to use the old fence holes like we had to do on the side fences - bonus!). I have three teenage boys and I've promised them cold hard cash for their cooperation with this project. Ideally, we'd like to have this done in a weekend....but it may take two, depending on the weater and what we can actually get done.
  2. Lay the brick path from the sun room back to the dog run in - The Builder started with a lovely chevron brick pattern, but this may be hard to continue all the way down since we only have so much reclaimed brick. Either way, we need to dig a new trench for the path, lay down sand, and then complete the pathway. It will basically run the lengthe of the house. We'll be able to walk out to the dog run in any weather and not have to wonder where or what we're stepping in...
  3. Fill in gravel -  some of the muddiest places in this yard are around the fire pit (just to the right of the logs in the snow photo!) and in the dog run. Which means if I need to bring the dogs into the sun room, the are a mudy disgusting mess! We'll put a layer of weed paper down, then sand, and then the gravel which should definitely reduce, if not eliminate, the mud issue. We'd like to use crushed granite for it's durability. I am pricing out a few places to see what the final estimate will be. We're willing to spend more to get a more durable product for this one. 
  4. Install the sod - once the gravel is in, we're going to rototill the remaining yard, level it out, fertilize it, and lay down sod. This sounds simple, but my dogs have tore up this yard.  They've dug holes, created running tracks, and just made a wreck of it. We've marked out where the grass will go so we can figure out how much sod we'll need.  We're leaving a dirt area at the end of the house so the dogs will have a place to do their thing, as well as a 'path' around the edge of the yard for them to do their laps. My dogs live here and I can't have a space that isn't suitable for them, but we will be training them to stay off the grass.
Which all leads to the fun and pretty stuff!!!  If you follow me on Pinterest Pinterest - MrsMike you may have already seen this pin on my Backyard Red-do board:

I told The Builder that while I don't want lights over/around my fire pit (we plan to have tiki torches - more on that DIY project in another post!) I would love to have them strung across the grass area.  Four simple posts and some cable wire should do the trick. It's not listed on The Plan because this is not something that has to be done this summer...but it's something I definitely WANT to do! It would be lovely for backyard entertaining!

Of course there are many more things on my Pinterest board that I'd like to get done eventually, but I'm trying to schedule things that can reasonably be done in the next four months. 


We also want to build some cozy seating around the fire pit and some small side tables to set food and drinks down. I love these chairs from Ana White

We figure four chairs and two benches should comfortably seat our guests. This is another project on the want list due to time constraints.

And the time constraints are the biggest issue we face. We figure six weeks to get The Plan completed, providing the weather cooperates (highly unlikely) and The Builder doesn't have any required overtime at his job. In a perfect world, that puts into the second week of April, and just four weekends until my family arrives. This is why the pretty lights and the chairs and benches may need to wait until summer or even next year (when my second son is graduating from high school!). We also have some indoor projects that have to be done, like kitchen cabinets to refresh (our update in 2016 for the counters and backsplash still look amazing, but the cheap cabinets are showing wear again) and some touch up paint to complete. 

My daughter (the 2016 graduate!) also wants to put in a container garden. I don't see that being completed that in time for June, but it could be a fun summer project since she grows most of her plants from seeds and can easily transplant them. I'd really love to have a nice herb garden and salsa garden! We've actually discussed where the perect spot in the backyard to build a raised container garden will be. So that's on the one day list. 

Let the Backyard Redo commence!